Author Archives: markn

About markn

Mark is the owner and founder of Timesheets MTS Software, an mISV that develops and markets employee timesheet and time clock software. He's also a mechanical engineer, father of four, and a lifelong lover of gadgets.

    Find more about me on:
  • googleplus
  • linkedin

Decrypting Blowfish Encrypted HEX String in PHP

I had need recently to use PHP to decrypt some short strings that were encrypted using the Blowfish algorithm. They were encrypted to HEX strings which necessitated converting them to strings. An added complication was that the mcrypt library in PHP is deprecated from version 7.3 onward and this code needs to function beyond that point. A couple of things to note are that the openssl_decrypt call requires a 16 byte key even though it only uses the first 8 bytes, the mcrypt_decrypt call also only uses the first 8 bytes of the key (but can also be safely passed an 8 byte key). Also you can see that RTRIM is used to get rid of any trailing \0 (NULL) or \4 (EOT) chars. It’s not unusual for there to be trailing characters as the encryption process pads out the text to be encrypted to a number of bytes that is evenly divisible by the encryption key. The data I’m decrypting here was originally encoded in an old VB6 application which padded out the string to be encrypted with EOT characters.

The key shown in this code is NOT the key used to create the encoded HEX string as I’m keeping the actual key secret because it’s used in some commercial software.

<?php
$encrypted_string = hexToStr("7363284E8E3FEA58");
echo "encrypted string:: ".$encrypted_string . "<br />";
echo "decrypted string:: ".decrypt_blowfish_string($encrypted_string,0);

function hexToStr($hex) {
    $str = '';
    for ($i = 0; $i < strlen($hex); $i += 2){
        $str .= chr(hexdec(substr($hex, $i, 2)));
    }
    return $str;
}

function decrypt_blowfish_string($string, $force_openssl = 0) {
    $key = 'somekey';
    $key_length = strlen($key);
    if ($key_length < 16) {
        $key = str_repeat($key, ceil(16 / $key_length));
    }
    if (function_exists('mcrypt_encrypt') && $force_openssl==0) {
        $plaintext = mcrypt_decrypt(MCRYPT_BLOWFISH, $key, $string, MCRYPT_MODE_ECB);
    } else {
        $plaintext = openssl_decrypt($string, 'BF-ECB', $key, OPENSSL_RAW_DATA | OPENSSL_NO_PADDING);
    }
    return rtrim($plaintext, "\0\4");
}
?>

RSYNC Upload Bash Script

Here’s a handy BSH script I use to upload files from my development server to the production server. Useful because it uses the –dry-run parameter as a default so you can easily make sure of what you’re going to break update before you actually do it.

#!/bin/bash
# dry run 
source_server=/some/source/folder/
destination_server=user@servername:/some/destination/folder
exclude_file=rsync-exclude-list.txt
clear
echo "Upload file to Production Server with Rsync"
echo "==============================================="
echo "Source: $source_server"
echo "Destination: $destination_server"
echo "Exclude: $exclude_file"
echo " "
read -r -p "Confirm Live Upload, press ENTER for --dry-run? [Y] " confirm

case $confirm in
	[yY] | [yY][eE][sS])
		dry_run=""
		 ;;
	*)
		dry_run="--dry-run"
		;;
esac

rsync -v -u -a -r $dry_run --rsh=ssh --stats --progress  --exclude-from $exclude_file "$source_server" "$destination_server"

Some things to note here. Firstly, if you don’t want to have to enter your password for the remote server every time you’ll have to generate a SSH key for your development server and add it to the accepted keys file on the live server. Second, make sure you put the trailing slash on the source_server variable. Third, make sure your user has the permissions required for the destination folder and for the sake of all that’s holy don’t be doing this with your root user.

Woocommerce Product to eBay Listing

It’s always handy to be able to easily list up WooCommerce products on eBay. I believe there are (mostly commercial) plugins that can automagically list items on eBay but in my case the products have a lot of custom meta data and needed a significant amount of logic applied to the product data before putting it up on the ole’ bay of E. So, time to dust of some of my HTML table coding kung-fu and develop something to suit my application.

1. Building the eBay template

eBay uses some sort of ancient HTML parser for it’s listings. It only works with very basic CSS and you’re stuck doing layouts using tables. It also doesn’t like whitespace anywhere in the HTML so you need to minify your carefully hand-coded layout just to get eBay to render it correctly. This of course turns it into a compacted unreadable mess so making changes is a painful loop of code change -> minify result -> upload to eBay and check layout -> rinse and repeat. You also have to remember that eBay doesn’t allow javascript in their listings, and you can’t have any external links other than images. While you’re building your template you’re going to want to sprinkle it with template codes that will be replaced by WordPress when you create your eBay listing HTML. I used codes like <%item_title%>, <%item_description%> and <%item_image%>. So a basic template could be as simple as this:

<h1><%item_title%></h1>
<%item_image%>
<p><%item_description%></p>

Once you’ve constructed your template you’ll need to put it somewhere that WordPress can find it. I suggest your child theme folder is the best location, which in my case is /wp-content/themes/storefront-child//

2. Write the PHP Code

Where you put the code to generate your eBay listing an fill your template is up to you. In my case, I’m using the Storefront theme and most of the custom meta data I use is pulled and displayed on the product description tab. So, I decided that the best place for the store admins to generate the eBay listing would be on the store listing page for the product in question. Basically I need the system to be available when the admins are actually logged into WordPress, as a result we’ll need a conditional button that will get the HTML we require for our eBay listing. Then we’ll need a way of generating the HTML, and finally a way getting the HTML into the clipboard so it can be pasted into the eBay listing manager.

The product description tab in the Storefront theme is available in /wp-content/themes/storefront/woocommerce/single-product/tabs/description.php. You can just drop a copy of this file in the same folder in the child theme and start working on it. You can find a cut-down copy of my code below, I’ve tried to comment it as thoroughly as possible.

<?php
/**
 * Description tab
 *
 * This template can be overridden by copying it to yourtheme/woocommerce/single-product/tabs/description.php.
 *
 * HOWEVER, on occasion WooCommerce will need to update template files and you
 * (the theme developer) will need to copy the new files to your theme to
 * maintain compatibility. We try to do this as little as possible, but it does
 * happen. When this occurs the version of the template file will be bumped and
 * the readme will list any important changes.
 *
 * @see 	    https://docs.woocommerce.com/document/template-structure/
 * @author 		WooThemes
 * @package 	WooCommerce/Templates
 * @version     2.0.0
 */

if ( ! defined( 'ABSPATH' ) ) {
	exit; // Exit if accessed directly
}

global $post;

//$heading = esc_html( apply_filters( 'woocommerce_product_description_heading', __( 'Description', 'woocommerce' ) ) );

?>

<?php if ( $heading ): ?>
  <h2><?php echo $heading; ?></h2>
<?php endif; ?>
<?php
    /*
    *get custom meta data, using the Woocommerce Custom Fields Factory custom fields can be pulled using wccap_field_name
    */
    $custom_meta1=get_post_meta( $post->ID, "wccaf_custom_meta1", true );
    $custom_meta2=get_post_meta( $post->ID, "wccaf_custom_meta2", true );


    $product_information='';    
    
    if (strlen($custom_meta1)>0)
        $product_information.='<tr><td class="information"><strong>Meta Field 1:</strong></td><td class="information">'.$custom_meta1.'</td></tr>';
    if (strlen($custom_meta2)>0)
        $product_information.='<tr><td class="information"><strong>Meta Field 2:</strong></td><td class="information">'.$custom_meta2.'</td></tr>';

?>
<div style="width: 80%; float:left">    
<?php 
    
    /*
     * This is the administrator dependent code.  We only want to include the javascrpt and generate the eBay HTML when
     * and administrator is logged in.  Firstly, putting in a bit of javascript to copy the content of a div to the clipboard
     * and displaying a button the user can click to the copy the HTML to the clipboard.
     */
    
     /* if the administrator is logged in */
    if (current_user_can('administrator'))
    {
?>
<script type="text/javascript">
function copyToClipboard(element_id) {
  var input_placeholder = document.createElement("input");
  input_placeholder.setAttribute("value", document.getElementById(element_id).innerHTML);
  document.body.appendChild(input_placeholder);
  input_placeholder.select();
  document.execCommand("copy");
  document.body.removeChild(input_placeholder);
}   
    </script>
    
    <button class="button" onclick="copyToClipboard('ebay');">eBay HTML to Clipboard</button>
    <?php        
    }
    /*
     * Display the custom product information
     */
    if (strlen($product_information)>0)
    {
    ?>   
        <table class="information"><?php echo $product_information;?></table>
    <?php    
    }

    the_content(); 
    
    /*
     * So we're done displaying the production information, now if the adminsitrator is logged in
     * we can go ahead and generate the eBay HTML and load it into a div so it can be copied to the 
     * clipboard and used on eBay.
     */
    if (current_user_can('administrator'))
    {
        /*
         * Load the eBay template.  It's been uploaded to /wp-content/themes/stirefront-child/
         */
        $ebay_template=file_get_contents(get_stylesheet_directory_uri()."/ebay-template.htm");
        /* get the item title */
        $item_title=the_title( '', '',false );
        /* get the item description */
        $item_description="";
        
        if (strlen($product_information)>0)
        {
            $item_description='<table class="information">'.$product_information.'</table>';
        } 
 
        /*get the item image */
        $item_image="";
        
        @$image = wp_get_attachment_image_src( get_post_thumbnail_id( $loop->post->ID ), 'single-post-thumbnail' );

        @$item_image=$image[0];
        
        if (strlen($item_image)>0)
        {
            $item_image='<img src="'.$item_image.'">';
        }
        /*replace the template fields with the values we need*/
        $ebay_template=str_replace("<%item_title%>",$item_title,$ebay_template);       
        $ebay_template=str_replace("<%item_description%>",$item_description,$ebay_template); 
        $ebay_template=str_replace("<%item_image%>",$item_image,$ebay_template);
        /*now put to the filled ebay tempalte into a hidden div so it can be copied to the clipboard later*/
        <?php
        <div id="ebay" style="display:none"><?php echo $ebay_template;?></div>
        ?>
    }
    

?>
</div>  

There’s some key things to note here:

  • I’m using javascript to copy the HTML to the clipboard when the user clicks a button. The method used to copy to the clipboard using javascript is covered here.
  • I’m using the WooCommerce fields factory to record custom meta data against my products. You may be using some other method so the way you’ll pull your custom data may vary.
  • The eBay html, copy to clipboard button, and javascript is only injected into the page when the administrator is logged in. This is accomplished using the current_user_can('administrator') call.
  • The eBay template can include any number of template fields. You could include dates, other custom meta data, or anything really. However, remember that eBay frowns on external links and including javascript. Also, I’d suggest keeping your boilerplate text like terms and conditions in your template file rather than putting them into WordPress. They’ll be easier to maintain there.

Use Javascript to Copy to the Clipboard

I’ve found it very useful to be able to copy web-content to the clipboard. For example, to generate boiler plate text in my online customer management system and paste it into Outlook for emailing. I’ve needed to use it a few times over the last couple of years and my go-to reference has usually been this Stack Overflow post. It basically comes down to whether or not a browser supports execCommand(‘copy’), if it does then you’re set. In it’s most basic form you can copy the content of a DIV with something like this:

function copyToClipboard(element_to_copy){
    //create an input range object to hold the DIV to copy
    var range = document.createRange();
    //select the node containing the element to copy
    range.selectNode(element_to_copy);
    //clear the current selection
    window.getSelection().removeAllRanges();
    //add the selected range to the current selection
    window.getSelection().addRange(range);
    //run exeCommand to copy 
    document.execCommand('copy');
    //clear the selection
    window.getSelection().removeAllRanges();
}

This method uses the input range object which can hold HTML values. It’s a HTML5 object and not supported in IE9 and earlier. The function is creating a new Range object, loading the content of the element we want to copy, clearing the current selection of all other ranges, adding the new range to the selection and then running execCommand(‘copy’) to put the contents into the clipboard.

Here’s a variation I’ve used that creates an input field temporarily to hold the content we want to copy. This is useful as it has wider support that that used above as it doesn’t rely on the Range object. Care must be taken, however, to replace single quotes with ' before putting content into the value attribute of the input.

function copyToClipboard(element_id) {
  var input_placeholder = document.createElement("input");
  input_placeholder.setAttribute("value", document.getElementById(element_id).innerHTML);
  document.body.appendChild(input_placeholder);
  input_placeholder.select();
  document.execCommand("copy");
  document.body.removeChild(input_placeholder);
}  

Random Notes for Setting up a New Ubuntu LAMP Server on Linode

This is the first entry written on the new home of this blog, a 1GB Linode server. I moved it here from a Pair account that I am in the process of closing. The server is running Ubuntu Server 16.04 LTS, Apache, MySQL, and PHP 7.

Using /srv/www as Web Root

It looks like Apache defaults to using /var/www as the web root. I prefer using /srv/www. To enable this open up /etc/apache2/apache.conf, comment out the section and uncomment the section. Make sure to change the AllowOverride directive to All or .htaccess and mod_rewrite won’t work.

Getting mod_rewrite to Work

You need to make sure that the AllowOverride directive is setup as per above. Then just enable the mod with a2enmod rewrite.

Installing PHP7

PHP7 is installed fairly easily with sudo apt-get install php7.0 php7.0-fpm php7.0-mysql.

Permissions for WordPress

When first installing WordPress make sure to

sudo chown -R www-data:www-data /srv/site-root/

After installation set permissions on folders and files using:

find . -type d -exec chmod 775 {} \;
find . -type f -exec chmod 644 {} \;

Note that 775 is used because we need www-data and a ftp user to be able to modify the WordPress install.

Then take ownership of the whole folder again with:

sudo chown -R ftp-user:ftp-user /srv/site-root/

And give ownership of wp-content to Apache with:

chown -R www-data:www-data /srv/site-root/wp-content

And secure wp-config.php with:

chmod 600 /srv/site-root/wp-config.php

Setting up a MySQL Database and User

It like to have a user for each WordPress install rather than using some sort of global user. It’s done fairly easily with:

create database database_name;
create user user_name@’localhost’ identified by ‘somepassword’;
grant all privileges on database_name.* to user_name@’%’ identified by ‘somepassword’;
grant all privileges on database_name.* to user_name@localhost identified by ‘somepassword’;
flush privileges;

Zipping a WordPress Install

Moving a WordPress install from Pair to Linode involved zipping up the install folder, transferring it via SFTP to the new server, and unzipping it. This is done with:

tar -zcvf somesitename.tar.gz somesitename/

And extracting with:

tar -xvzf somesitename.tar.gz

The extraction will create the folder to put the contents in.

Basic Process of Moving Site

  1. Zip up WordPress install folder.
  2. Dump database using MySQL Dump or phpMySQL. Remember to add use database_name; to start of MySQL Dump file.
  3. Transfer install folder and MySQL dump to new server using SFTP.
  4. Create new database and user. Import data to database using something like mysql -uroot -ppassword < mysql_dump.sql
  5. Unzip WordPress tar.gz file to /srv.
  6. Edit the /srv/domain_name/wp-config.php file to enter new database details and login.
  7. Create new /srv/domain_name-logs/ folder for Apache logs and set www-data as the owner.
  8. Set permissions on WordPress folders as covered earlier.
  9. Make entry into /etc/hosts file for 127.0.0.1 site_name.
  10. Create /etc/apache2/sites-available/site_name.com.conf file making sure to set the web root and log file path correctly.
  11. Enable the site with a2ensite site_name.com.conf.
  12. Test by setting your local machine’s hosts file for the domain to the server IP address.
  13. Setup the new DNS Zone on Linode for the site.
  14. Adjust the Name Servers at the domain registrar for the domain.
  15. Wait for the DNS records to propagate!

How Not to Mess Up a Multi Domain SSL Renewal

I’ve just finished a few hours of fun messing up a multi domain SSL certificate renewal. In the first draft of this entry I did not use the word mess, messing, or messery. I used another four letter word, but since then I’ve settled a bit and have come back and edited out the profanity. I managed to un-mess it today so in the interests of not performing the same messery at some point in the future here’s what I need to do next time.

  1. The Namecheap Multi-Domain PositiveSSL certificate requires you to have a certificate for the non-www and the www versions of a domain. In fact, it requires you to have one for each sub-domain of a parent domain you want to secure.
  2. If renewing the SSL certificate then you should generate a new CSR file. Make extra sure to use the non www version of the domain as the primary domain.
  3. Using the Namecheap HTTP DCV validation method is dead simple but make sure to read the instructions carefully as they can (and have) changed the folder they want the validation file uploaded to. It was just the root folder but just a few weeks later they wanted it in the ./well-known/pki-validation/ folder. What the?!

When a new certificate is issued make sure to upload the crt and ca-bundle file to the /etc/apache2/some-folder-name-date/ folder to keep it apart from your old certificate files. Don’t forget to put the server .key and .csr file there and then protect the lot with chmod 400

Using the Apache VirtualHost system requires the following sort of entry for a site:

<VirtualHost *:80>
    ServerAdmin admin@domain.com
    ServerName www.domain.com
    ServerAlias domain.com *.domain.com
    DocumentRoot /srv/www/public_html/
    Redirect permanent / https://www.domain.com
</VirtualHost>

<VirtualHost  *:443>
    SSLEngine On
    SSLCertificateFile /etc/apache2/ssl/domain-com-august-2017/some_file.crt
    SSLCertificateKeyFile /etc/apache2/ssl/domain-com-august-2017/server.key
    SSLCertificateChainFile /etc/apache2/ssl/domain-com-august-2017/some_file.ca-bundle
    ServerName www.domain.com
    ServerAdmin admin@domain.com
    ServerAlias domain.com *.domain.com
    DocumentRoot /srv/www/public_html/
    ErrorLog /srv/www/domain-logs/error.log
    CustomLog /srv/www/domain-logs/access.log combined
    AddHandler cgi-script .cgi .pl
</VirtualHost>

Now, I am not 100% sure if the ServerName/ServerAdmin/ServerAlias/DocumentRoot entries need to be duplicated. But until this point it’s never broken anything so no harm done. The key point of this is that because the SSL handshake is the very first thing that happens between a client the web-server you absolutely 100% need a SSL certicate for the www subdomain as well as the main domain. There’s no getting around it with redirects in .htaccess or any other such trickery.

Allowing ‘0000-00-00’ as Default Value for MySQL datetime Column

It can be useful to allow the default value of a MySQL date / datetime column to be set to zero, it makes checking if it’s initialised simple and saves you having to deal with pesky null values. It also allows you to set the column as NOT NULL. However, from version 5.6 onwards MySQL has STRICT_MODE for queries turned on, as well NO_ZERO_IN_DATE mode turned on. If you try to create new column with something like:

`some_field` datetime DEFAULT ‘0000-00-00 00:00:00’

You’ll see this error:

Invalid default value for ‘some_field’

This is pesky if you’ve got code written for earlier versions of MySQL and you don’t want to go back and re-write it all to check for NULL instead of zero. Turning these things off is pretty simple. On Ubuntu I created a file in /etc/mysql/conf.d/ called disable_strict_mode.cnf. The file contents are shown below:

[mysqld]
sql_mode=IGNORE_SPACE,ERROR_FOR_DIVISION_BY_ZERO,NO_AUTO_CREATE_USER,NO_ENGINE_SUBSTITUTION

Then restart MySQL with sudo service mysql restart and you’ll be able to create date and datetime fields with a zero default value.

WooCommerce – Custom Product Fields and WooCommerce Fields Factory

WooCommerce does have ‘attributes’ available for products but like most things in WC these are tailored for users selling clothing and various other consumer products. In my application each product is unique and once sold gone forever. Each product has common characteristics though, such as year of manufacture, metal it is made from, and where it was manufactured. As a matter of course the user of the WooCommerce store wanted to define a set of characteristics that would be entered when a new product was created and then wanted those characteristics displayed in the product listing. A good solution was arrived at through the use of the WooCommerce Fields Factory plugin and modifying the Storefront Single Product->Tabs->description.php template.

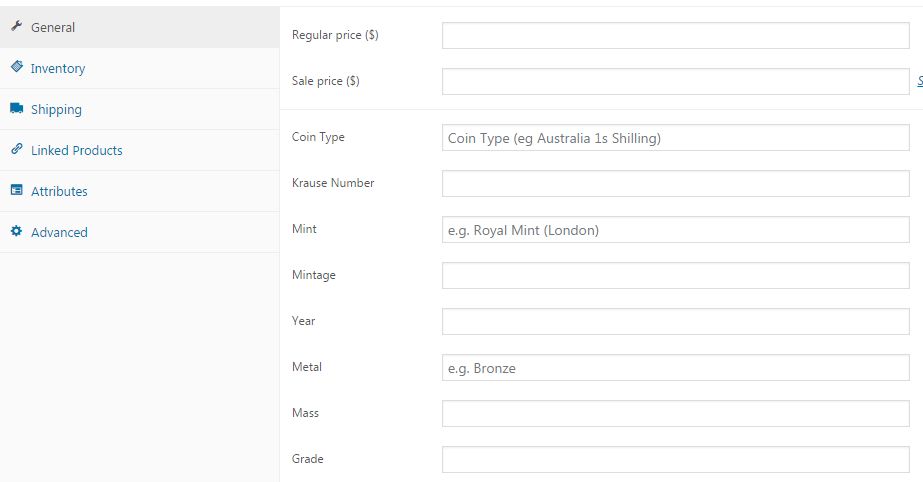
The WC Fields Factory plugin allows you to add custom fields to your WooCommerce products. It has the added benefit of allowing you to display those fields on the admin side where they can be edited at the product level by your shop admins. Nifty. In my application I created a group of Admin Fields called “Coin Attributes” and then populated the group with the fields that the customer wanted for their products.

Once that was done and I made sure to check the Hide in Product Page and Hide in Cart & Checkout Page for each field. Now when I add a product I see this in the General tab for each product:

So now we can store the data with each product as needed. The next step is to make sure the data displays as required for products. The key is that we only want the data field to display if there’s a value set. To do that we just need to do a bit of tweaking to the Storefront Single Product->Tabs->description.php template. We do that by making a copy of it into the /woocommerce/single-product/tabs folder of our child theme. In our case we just wanted to display the data in a table. So the PHP code required looked like this:


<?php
    //get the custom field data using the get_post_meta function.  All WC Field Factory fields are prefixed with wccaf_ and then the field name
    $coin_type=get_post_meta( $post->ID, "wccaf_coin_type", true );
    $krause_number=get_post_meta( $post->ID, "wccaf_krause_number", true );
    $mint=get_post_meta( $post->ID, "wccaf_mint", true );
    $mintage=get_post_meta( $post->ID, "wccaf_mintage", true );    

//display information only if there's a value set
    $coin_information='';    
    
    if (strlen($coin_type)>0)
        $coin_information.='<tr><td class="coin-information"><strong>Coin Type:</strong></td><td class="coin-information">'.$coin_type.'</td></tr>';
    if (strlen($krause_number)>0)
        $coin_information.='<tr><td class="coin-information"><strong>Krause Number:</strong></td><td class="coin-information">'.$krause_number.'</td></tr>';    
    if (strlen($mint)>0)
        $coin_information.='<tr><td class="coin-information"><strong>Mint:</strong></td><td class="coin-information">'.$mint.'</td></tr>';         
    if (strlen($mintage)>0)
        $coin_information.='<tr><td class="coin-information"><strong>Mintage:</strong></td><td class="coin-information">'.$mintage.'</td></tr>';  

    if (strlen($coin_information)>0)
        echo '<table class="coin-information">'.$coin_information.'</table>';
?>

Of course where exactly you echo out the data in the TABS template is up to you and determined by how your product pages are laid out.
 

WooCommerce – Display SOLD Instead of Price for Sold Products

If you’re using WooCommerce and selling one-off products you don’t necessarily want to use the default terminology for sold out products. You might want to hide the sold price and remove the WooCommerce “In Stock” messages that are better suited to sites selling t-shirts and so on. Removing the stock availability messages is simple enough using the woocommerce_get_availability filter.

    add_filter('woocommerce_get_availability', 'my_get_availability', 1, 2);

    function my_get_availability($availability, $_product)
    {
        $availability = '';
    }

Couldn’t be any simpler, just set the availability text to an empty string.  Presto chango those messages are gone.

Replacing the price with SOLD when a product is sold is almost as simple, it just requires hooking into a couple more filters.

    add_filter("woocommerce_variable_sale_price_html", "my_remove_prices", 10, 2);
    add_filter("woocommerce_variable_price_html", "my_remove_prices", 10, 2);
    add_filter("woocommerce_get_price_html", "my_remove_prices", 10, 2);
    function my_remove_prices($price, $product)
    {
        if (!$product->is_in_stock())
        {
            $price = "SOLD";
        }
        return $price;
    }

WooCommerce – Add Phone Numbers to Header of Storefront Theme

I happen to like web stores that have contact details in prominent locations so it’s useful to be able to add phone numbers to the header of a site using WooCommerce. In my particular application I’m using the Storefront theme.  Firstly you need a  bit of CSS in your child theme’s style.css file. Your widths might be different and I’ve adjusted the margin of the site-search div to compress things a bit.

.header-contact-details {
    width: 50.7391304348%;
    float: right;
    margin-right: 0;
    clear: none;
}

.site-search{
    margin-bottom:10px;
}

Then you can use the storefront_header action to insert some code into the header.  To set the priority of the insertion have a look at the storefront header.php file.  In  my case I wanted the new HTML in between storefront_product_search and storefront_primary_navigation_wrapper so I set the priority to land in between those two.


//add phone numbers to header

    add_action('storefront_header', 'storefront_add_header_phone', 41);

    function storefront_add_header_phone()
    {
        ?>

        <div class="header-contact-details" style="text-align:right"><p style="color: rgb(64, 48, 74);font-weight:600;font-size:20px;"><i class="fa fa-phone" style="color:rgb(155, 126, 230)"></i> 555 555 555 (AUS)  <i class="fa fa-phone" style="color:rgb(155, 126, 230)"></i> +61 555 555 555 (INTL)</p></div>
        <?php
    }

The code is pretty clear, I make use of the font awesome font set to have some pretty phone icons and colour them to match the rest of the site style. Of course there’s a little bit of CSS inline here that could be moved into the style.css file but for now it works and I am happy with that. Here’s the what the end result looks like: