Author Archives: markn

About markn

Mark is the owner and founder of Timesheets MTS Software, an mISV that develops and markets employee timesheet and time clock software. He's also a mechanical engineer, father of four, and a lifelong lover of gadgets.

    Find more about me on:
  • googleplus
  • linkedin

Dipping my Toes in the ODesk Pond

I’ve known for a while that the main limiting resource in the on-going growth of my software business is me. I’ve had real issues being willing to farm out work to others and it hasn’t helped that when I have reached out and found others to do work for me that results have mostly been awful. There’s been one good experience on 99Designs a few years back and about six months ago I found a Virtual Assistant in Canberra who has been doing good work for me. But other than those two I’d say quite cheerfully that I’ve wasted my money paying people to do work for me.

My problem right now is that I want to build some Explainer Videos for one of my products and need some inspiration in terms of the tone, and content of the scripts for those videos. The videos will be used on Ad Words landing pages. I want them to be short (two minutes or so) and to quickly establish empathy with the potential users (we understand your problem) and then present them with a solution (my software). I’d like the videos to be light-hearted and, if possible, amusing. After all, my products are pretty boring so any humour that can be injected can only be a good thing. I’ve written one script myself but really want a few so I can get 10-15 minutes of voice talent recorded with the eventual aim of getting several videos made and A/B testing them. Now, I know that I should write the scripts myself but to be perfectly honest I don’t have the time or the talent to write multiple scripts from a blank page. So I was hoping that I could find some people with some experience creating explainer video scripts and they could write some scripts for me. Even if I don’t use the scripts at least they’d provide me with some inspiration so I could develop a few more myself.

ODesk seems to be the freelancer site of choice these days. So I’ve toddled off and set up an ad for 2 x 2 minute explainer video scripts. After a week or so I’d got 6 applications and a few hours ago I chose two of the applicants to interview via Skype. I’ve since conducted those interviews and hired both applicants. My expectations are not high but for the cost a few hundred dollars I might get one script I can use and I’m fairly certain I’ll get some useful ideas I can work on myself.

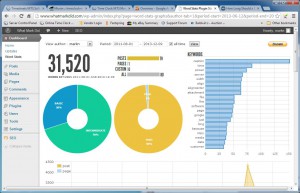
WordPress feeds my desires for useless statistics much better than MovableType ever could. Out of the box I can see how many words are in a post but even better I can get aggregate stats for the blog as a whole using a plugin like Word Stats. Below you can see the statistics as they stand right now. Pointless but still cool to know.

What Mark Did Statistics

What Mark Did Statistics

Cord Panorama WiFi Internet Radio Player

Cord Panorama Internet Radio Player

Cord Panorama Internet Radio Player

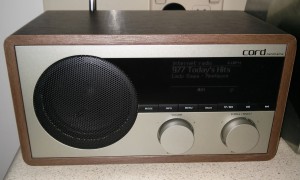
We’ve been wanting a wifi internet radio player we could listen to around the house and perhaps take outside, plug in, and listen to out there. So, after a week or two of looking around online (and not really knowing what we needed) I made a spur of the moment decision and above you can see our new Cord Panorama WiFi Internet Radio/DAB+ Digital Radio / Media Player / FM Radio. We just bought it at 40% off of normal price from JB Hifi at the insanely good price of $132. It can play 100,000+ internet radio channels, stream media from a DLNA server, is a DAB+ digital radio receiver, and is a regular FM receiver too. And to top it all off it has an auxiliary input so you can plug in your iPod or other device and play music from that too. It has a bit of a retro look wood finish on the sides and top and a silver front panel with a black and blue OLED display. There’s a single speaker with a 7W digital amplifier, which it turns out is more than loud enough to fill our living area with music or to put it under our verandah and hear it while we’re in the backyard. There’s also a little remote which you can see below.

Cord Panorama Remote

Cord Panorama Remote

The device can work with a WiFi or wired connection and has a very simple setup wizard that allows you to enter your WiFi password pretty easily. Once setup the radio is controlled from either the front panel or remote. It operates in one of several modes (FM, DAB+, Media Streaming, Internet Radio, or AUX) each mode has slightly different menus and it’s own set of user selectable favourite stations. DAB+ and FM tuning were fairly effortless and intuitive. The media streaming mode detected our media server without a hassle and browsed quickly and easily through our media library and played our music perfectly.

Internet radio proved to be a little more problematic as the Cord unit kept timing out when attempting to retrieve a channel list from the internet. It started working after a day or so and allowed us to choose from many different Australian internet radio stations by genre. We could also search through the complete radio list allowing us to find our favourite stations easily. I’m not sure what the problem was with the network timeouts but I do note that the Cord Panorama has some sort of online integration with Wifi Radio Frontier site. And that site was down yesterday and this morning so I bet the two events are linked. The online integration allows the Cord Panorama users to find internet stations online and mark them as favourites and then have those stations downloaded to the radio unit. Pretty neat.

So what do I think of the Cord Panorama Internet Radio Player? I think it’s perfectly fine. The user interface is easy to understand, I didn’t have any problems with it and my partner has been using the radio from the front panel without issue. The front panel display is clear and useful and the tactile feel of the buttons and dials are quite nice. I’m even fond of the retro wood-grain finish. If I had anything bad to say I’d restrict it to the remote which is a bit small and fiddly and probably not that useful. But putting that to one side the Cord functions as advertised and pretty much flawlessly. The sound quality is good and it plays music from a variety of different sources exactly as advertised. And at the price we got it at I consider it to be something of a bargain. Highly recommended if you’re in the market for a wireless internet radio player.

Update December 9 2013

When I was having problems with the player connecting to internet radio stations I shot off an email to the distributor of the Cord Panorama in Australia (Volition Australia) asking them if they knew what the problem was. To be honest I wasn’t expecting a response as I’ve never had much luck contacting service departments by email before. But here we are at 10:00AM on a Monday morning and I got a response! Amazing service. Here’s what they had to say:

Mark,

Thanks for your enquiry.

It seems that Vtuner, the internet radio service used by panorama was down for a period of time over the weekend.
After checking this morning, it is up and running.
Let me know if you still have any problems.

Regards,

Michael Noorbergen
Technician

So, there’s your answer. The Cord Panorama uses the Vtuner website to get some data and it was down on the weekend.

Here we are on WordPress

Well it’s taken me half a day but it was fairly painless. I’ve ported over about 80 blog entries to WordPress and put some 301 redirects in the .htaccess file to redirect the old MovableType URLs to the new ones. I had to install a number of WP plugins to get things working the way I wanted. This included AuthorSure (for Google+ authorship), Google XML Sitemaps, NK Google Analytics, Responsive Lightbox, WordPress SEO, and WP Syntax Highlighter. I must say being able to seamlessly upload images from within the WP editor and markup code directly (without having to remember codes) is fabulous.

There’s still a couple of things to sort out, mainly to do with the logo. But I am sick of doing this today so I’ll leave it for another (more motivated) day.

Moving this blog from MovableType to WordPress

Gentle reader, I am sure you’ll be pleased to know that this blog gets almost no traffic. It’s a busy day when one visitor shows up here to disturb the electronic cobwebs. This doesn’t bother me much but I’ve always wondered if putting the blog on a different platform would help. Right now it’s on a very old version of MovableType. I’m going to move it onto WordPress, which is the most popular blogging platform out there. I’ve used it enough to know it’s pretty freaking awesome. I’ve also heard that WP is the ducks testicles as far as SEO goes especially when a good SEO plugin like Yoast’s SEO is used. While I don’t particularly believe that a simple change of blog platform can help that much there’s no harm in testing. So as something of an experiment I’ve decided to move this blog to WordPress, install the Yoast SEO plugin, do a bunch of 301 redirects from the old blog entries to the new ones and see if the blog actually gets any improvement in terms of the traffic it sees. For reference here’s the traffic stats for the last 3 months (prior to December 6 2013).

Vists: 431
Unique Visitors: 320
Pageviews: 676
Pages/Visit: 1.57

The visits were sourced from referrals (263), direct type ins (97), organic searches (56) and social referrals (15).

Building a Garage Door Sensor with an Arduino Nano

The Problem

Our two car garage has a roller door on the front and back. The one on the front of the house is motorised and activated with a remote control. You cannot see if the front roller door is open from anywhere within our house so the only way to check if it is open is to walk outside and look. If you remember that is. The problem is that we do not want to go to bed and leave the front roller door on the garage open and we have done so a few times.

The Solution

Create some sort of sensor and indicator letting us know that the front roller door is open. The sensor should be reliable and the indicator should be obvious (especially when night has fallen) and not require us to walk outside to check on the status of the door. I’ve had an Arduino starter kit sitting on my desk for a while so (of course) I thought that the solution had to include an Arduino.

The Sensors

I wanted to detect if the door was up or down so this would require two sensors. Initially I was thinking along the lines of an ultrasonic detector but the cost of this was prohibitive as I needed two of them. In the end I settled on simple magnetic reed switches of the type you see in home security systems. One would be mounted to the door frame at the bottom and one at the top. A magnet would be fixed to the door to trigger the switches as the door moved up and down. The two door sensors with paired magnets were $5.

The Indicator

Initially I had thoughts of a two unit system. One sender unit mounted on the garage door and a receiver unit that sat inside with an indicator light with RF comms using one of the many different types of Arduino RF shields. But this was complete overkil so in the end I settled on 2 colour high intensity 3 watt LED that could be mounted outside our kitchen window and be driven by a cable. The LED module would need to be driven by a decent constant current power supply so I bought a couple of 330mA units at the same time. These PSU’s could be driven by a 0-5V PWM (pulse width modulated) signal to adjust the intensity of the driven LED. The LED module was $3, a heatsink to mount the LED on was $3, and the PSU’s were $9 each. A transparent poly-carbonate box to install the LED in was $9. The cable ended up being some 8 core alarm cable that cost about a dollar a meter and I used some 6 pin audio plugs for each end. Total cost for the cable was around $20 or so.

The Arduino

My Arduino kit contains a Arduino UNO clone. This was bigger than I wanted so I settled on a cloned Arduino Nano from eBay which was about $10. This had the digital inputs I wanted, more than enough memory to hold the simple sketch I’d write, could be run from a 12V DC plug pack, and the PWM outputs I’d need.

Enclosure and Breadboard

The enclosure would need to hold the Arduino Nano, the two LED PSU’s, and a small breadboard. It would also need to take the wires from the door sensors, have a female socket to take 12V and a female connector to plug our LED cable into. The breadboard was used to make a circuit that would ground out the sensor signals and route 3.3V to the sensors and 12V to the LED power supplies. All connections from the circuit to the Arduino and the Arduino to the power supply were done via connectors and cables I had laying around from old PC builds. Total cost of the enclosure and assorted components (and a 2A 12V DC plug pack) ran out to about $40.

Build Problems

One of the LED PSU’s was DOA so I settled on running just one of the LED colours. I chose to indicate different door states by flashing the LED at different rates. A second problem was that the roller door frame was significantly out of square and the magnets supplied with the reed switches were not strong enough to trigger the switches. I solved this by purchasing a rare earth magnet and gluing it to the roller door (cost was $12).

Arduino Code

I decided on a simple state engine for the code to run my indicator light. The first state was door down. In this state the Arduino was in a “door closed sleep” state waiting for an interrupt from the bottom door sensor. When the state of this sensor changed the Arduino would wake and enter a “door in transition” state and flash the LED rapidly. When the top sensor triggered the door would enter a third “door up” state and pulse the light slowly. When the roller door was lowered the Arduino would enter the “door in transition” state again and stay that way until the door closed and the bottom sensor was triggered. The Arduino would now enter a “door closed indicator” state and leave the LED on for 10 seconds before entering the “door closed sleep” state. Here’s the Arduino sketch I came up with to accomplish this:

#include <avr/interrupt.h>
#include <avr/power.h>
#include <avr/sleep.h>


const int blueLED = 3;
const int ledBrightness=50;
const int doorDownSensor=2;
const int doorUpSensor=4;
int doorDownSensorState=0;
int doorUpSensorState=0;
int oldDoorUpSensorState=0;
int oldDoorDownSensorState=0;
int tmpState=0;
int i=0;
int pulseStep=1;
int pulseBrightness=0;
unsigned long blueLEDStartTime;
String tmpString;

unsigned long endLastPulse;
unsigned long pulseDelay=3000;

void setup() {
  // put your setup code here, to run once:
  pinMode(blueLED,OUTPUT);
  pinMode(doorDownSensor,INPUT);
  pinMode(doorUpSensor,INPUT);
  
  Serial.begin(9600);
}

void loop() {
  tmpState=digitalRead(doorDownSensor);
  
  
  if (tmpState==HIGH)
    tmpString="HIGH ";
  else
    tmpString="LOW ";  

  if (tmpState != oldDoorDownSensorState)
  {
    doorDownSensorState=1-doorDownSensorState;
    delay(50);
    if (doorDownSensorState==1)
    {
      blueLEDStartTime=millis();  
    }
  }
  oldDoorDownSensorState=doorDownSensorState;
  
  tmpState=digitalRead(doorUpSensor);

  if (tmpState==HIGH)
    tmpString+="HIGH ";
  else
    tmpString+="LOW "; 
    
  if (tmpState != oldDoorUpSensorState)
  {
    doorUpSensorState=1-doorUpSensorState;
    delay(50);
  }
  oldDoorUpSensorState=doorUpSensorState;  
  
  tmpString+="DOWN_STATE::";
  tmpString+=doorDownSensorState;
  tmpString+=" UP_STATE::";
  tmpString+=doorUpSensorState; 
  Serial.println(tmpString); 
    
  if (doorDownSensorState==1)
  {
    if ((millis()-blueLEDStartTime)<=10000)
      analogWrite(blueLED,ledBrightness); 
    else
    {
      analogWrite(blueLED,0);
      sleepNow();
    }
  }

  
  if (doorUpSensorState==1)
  {
    if (endLastPulse==0 || (millis()-endLastPulse)>pulseDelay)
    {
      pulseBrightness+=pulseStep;
      if (pulseBrightness<0)
      {
        pulseBrightness=0;
        pulseStep=-1*pulseStep; 
        endLastPulse=millis();
      }
      if (pulseBrightness>ledBrightness)
      {
        pulseBrightness=ledBrightness;
        pulseStep=-1*pulseStep; 
      }      
      analogWrite(blueLED,pulseBrightness);
      delay(25);
    }

  }
  else
  {
    endLastPulse=0; 
  }

  
  if (doorDownSensorState!=1 && doorUpSensorState!=1)
  {
    if ((millis() % 1000)<500)
      analogWrite(blueLED,ledBrightness);    
    else
      analogWrite(blueLED,0);        
  }

  
}

void sleepNow()
{
    // Set pin 2 as interrupt and attach handler:
    attachInterrupt(0, pinInterrupt, LOW);
    delay(100);
    //
    // Choose our preferred sleep mode:
    set_sleep_mode(SLEEP_MODE_PWR_DOWN);
    //
    // Set sleep enable (SE) bit:
    sleep_enable();
    //
    // Put the device to sleep:
    sleep_mode();
    //
    // Upon waking up, sketch continues from this point.
    sleep_disable();
}

void pinInterrupt(void)
{
  detachInterrupt(0);
}

There’s a couple of things to note here. First, the Nano only has interrupts on IO pins 2 and 3 so the bottom door sensor had to be on one of these pins. I used pin 2 which is interrupt 0. Also, I wanted to drive the LED power supply with a PWM signal so I had to use one of the PWM capable outputs, in my case I used pin 3.

I developed this code on my Arduino UNO with the circuit mocked up on a spring breadboard that came with my starters kit. Flashing the code to the Nano was troublesome because it turns out that the Nano I bought had a problem with the serial chip (UART) and just wouldn’t talk to my computer. After much googling I just needed to download and install an older driver for the USB/Serial driver on my PC and suddenly I could talk to the Nano.

Installation

The hardware mounted up easily enough. The reed switches included adhesive and stuck well enough to the door frame once I had cleaned the metal with some acetone. The door magnet was put in place with some cyano acrylate glue. Cabling from the sensors to the control box was cheap two core cable and the control box was mounted to the wall with some wall plugs I had lying around. A friend of mine helped me route the LED cable through my roof cavity and the LED box was stuck to one of the beams of the verandah outside our kitchen window.

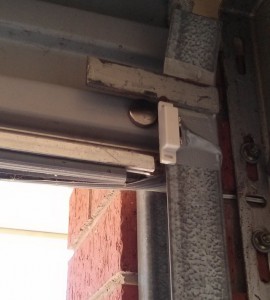
Here’s one of the reed switches mounted to the top of the door frame. You can see the rare earth magnet (the silver disk) on the door itself.
Reed Sensor and Magnet

Reed Sensor and Magnet

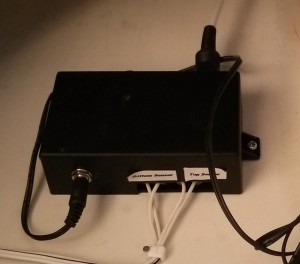
And here’s the control box containing the Arduino Nano, home made circuit, and one of the constant current power supplies that drive the LED. The 12V power goes in via the plug at the bottom left while the cable coming out the top right goes into the roof cavity and drives the LED.
Arduino Enclosure

Arduino Enclosure

Finally, here’s the LED box mounted to a beam on our verandah. It’s the blue thing in the middle of the picture. You can see the cable running across to the top of the beam it’s mounted on.
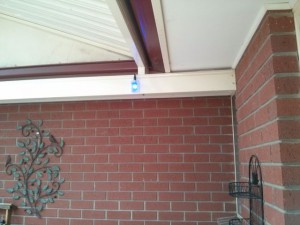
LED Enclosure

LED Enclosure

Here’s what it looks like in operation:

innosetup and .NET 4.0

My simple timesheet software, Timesheets Lite is a a C# program based on Winforms and the DXperience library for WinForms. It is installed with an innosetup script. Up until yesterday the software required the .NET 2.0 library and the installer could detect if .NET 2.0 was installed and download and install it if it wasn’t. Windows 8 was an exception to this rule as .NET 2.0 (actually .NET 3.5) is a Windows feature that needs to be enabled rather than something that needed to be installed. This wasn’t too difficult to get around because you (used) to be able to use DISM to enable Windows features.

Previously my innosetup script detected if Windows 8 was the target OS and then could simply enable the .NET 3.5 feature using this:

Exec('Dism', ' /online /enable-feature /featurename:NetFx3 /All /NoRestart', '', SW_SHOW, ewWaitUntilTerminated, ResultCode);

This had worked fine previously because Windows went away (presumably to the Windows Update site) and downloaded what it needed from there. But it doesn’t work any longer and to get DISM to enable .NET 3.5 the /source parameter must be specified pointing to a local copy of the Windows 8 installation media or an ISO. Clearly this isn’t acceptable for my purposes. Hence I decided to update Timesheets Lite to require the .NET 4.0 library (which is installed on W8 by default). This threw up some other problems though because now I needed to detect .NET 4.0 on earlier versions of Windows, and download and install it during the Timesheets Lite installation process.

This was (surprisingly) easy. I made use of the innosetup .NET detection function from this page and modified the inno script I’d written years ago to download and install .NET 2.0. Here’s some code from my innosetup script for giggles. Firstly, the InitializeSetup function which determines what version of Windows is the target and uses the IsDotNetDetected function to check for the .NET 4.0 client or full installation.

function InitializeSetup(): Boolean;
begin
    dotNetNeeded := false;
    Windows8 := false;
    Result := true;

    if (Version.Major=6) and (Version.Minor=2) then
      begin
        Windows8:=true;

      end;


    if (not IsDotNetDetected('v4\Client', 0)) and (not Windows8) then 
      begin
        if not IsDotNetDetected('v4\Full', 0) then
          begin
              dotNetNeeded := true;
          end
      end 

     if dotNetNeeded then
      begin
            if (not IsAdminLoggedOn()) then
                begin
                    MsgBox('This program needs the Microsoft .NET 4.0 Framework to be installed by an Administrator', mbInformation, MB_OK);
                    Result := false;
                end
            else
                begin

                    
                    dotnetRedistPath := ExpandConstant('{src}\dotnetfx.exe');
                    if not FileExists(dotnetRedistPath) then
                        begin
                            dotnetRedistPath := ExpandConstant('{tmp}\dotnetfx.exe');
                            if not FileExists(dotnetRedistPath) then
                                begin
                                    isxdl_AddFile(dotnetRedistURL, dotnetRedistPath);
                                    downloadNeeded := true;
                                end
                        end

                    SetIniString('install', 'dotnetRedist', dotnetRedistPath, ExpandConstant('{tmp}\dep.ini'));
                end
      end
end;

Next up I’ve added some code to the NextButtonClick function that runs when the current page is wpReady (read to install).


  dotnetRedistURL = 'http://download.microsoft.com/download/9/5/A/95A9616B-7A37-4AF6-BC36-D6EA96C8DAAE/dotNetFx40_Full_x86_x64.exe';

function NextButtonClick(CurPage: Integer): Boolean;

var
  hWnd: Integer;


begin

  Result := true;

  //*********************************************************************************            
  // Only run this at the "Ready To Install" wizard page.
  //*********************************************************************************
  if CurPage = wpReady then
    begin

        hWnd := StrToInt(ExpandConstant('{wizardhwnd}'));


        // don't try to init isxdl if it's not needed because it will error on < ie 3

        //*********************************************************************************
        // Download the .NET 4.0 redistribution file.
        //*********************************************************************************
        if downloadNeeded and (dotNetNeeded = true) and Windows8 = false then
            begin
                isxdl_SetOption('label', 'Downloading Microsoft .NET Framework 4.0');
                isxdl_SetOption('description', 'This program needs to install the Microsoft .NET Framework 4.0. Please wait while Setup is downloading extra files to your computer.');
                if isxdl_DownloadFiles(hWnd) = 0 then Result := false;
            end;

        //*********************************************************************************
        // Run the install file for .NET Framework 4.0. This is usually dotnetfx.exe
        //*********************************************************************************
            if ((dotNetNeeded = true)) then
            begin

                if Exec(ExpandConstant(dotnetRedistPath), '', '', SW_SHOW, ewWaitUntilTerminated, ResultCode) then
                    begin

                        // handle success if necessary; ResultCode contains the exit code
                        if not (ResultCode = 0) then
                            begin

                                Result := false;

                            end
                    end
                    else
                        begin

                            // handle failure if necessary; ResultCode contains the error code
                            Result := false;

                        end;
            end;


    end;

end;

I tested this script on XP, Vista, Windows 7 and Windows 8 and it works very well. The .NET 4.0 download is about 50MB so it’s not too big an impost for users. And I suspect most people will have .NET 4.0 installed anyway. Note that you’ll have to to be using the isxdl innosetup plugin for this installation procedure to work.

Uploading to a Production Server with RSYNC

I knew you could use RSYNC to synchronize a local copy of a website with the files on your production server. In fact I’ve known it for long enough to have tried to get it working a few years ago but failed miserably. Well I’ve learned a bit since then (well I like to think so anyway) so I thought I’d give it another go this this morning. And, it was surprisingly easy. In this guide I refer to my local server (a teeny tiny Ubuntu server) as the LOCAL SERVER and the remote production server as the REMOTE SERVER.

Install SSH Key on Remote Server

Firstly I needed to install a SSH key on my REMOTE SERVER so my LOCAL SERVER could log into it without me needing to enter a password every time I wanted to synchronize the files. This is easy enough, on the LOCAL SERVER enter the following:

sudo ssh-keygen

Enter the default values as prompted and this will create a public key in ~/.ssh/ called id_rsa.pub. This file needs to be set to the remote server. This is done easily with:

scp ~/.ssh/id_rsa.pub user@remote_server.com:/home/user/uploaded_key.pub

Then this file needs to be appended to the authorized_keys file on the REMOTE SERVER with:

ssh user@remote_server.com "echo `cat ~/.ssh/uploaded_key.pub` >> ~/.ssh/authorized_keys"

Construct RSYNC Included and Excluded Files / Folders List

If you’re like me your development folders are littered with test files and directories that you don’t want on your production servers. So you’re going to need to create inclusion and exclusion lists for RSYNC to use so it knows what to upload and what not to upload. This is simply done using text files with file / folder specifications on separate lines. For example my include.txt looks something like this:

app
classes
create-scripts
cron-scripts
css
inc
js
images
tooltips
validation_scripts

While my exclude looks something like this:

/app/jscal
/css/img/Thumbs.db
/create-scripts/*.txt
app/test-first-day-of-week.htm
app/test-mcrypt.htm
app/images/Thumbs.db

These files can be written in nano and saved somewhere sensible (probably where you’re going to put your rsync bash script).

Write your BASH script

Next step is to write a very short bash script that includes your RSYNC command. My script looks like this:

#!/bin/bash
rsync  -v -u -r -a --rsh=ssh --stats --progress --files-from=include.txt --exclude-from exclude.txt /srv/windows-share/local-source-files/   user@remote-server:/srv/www/remote-source-files/

Don’t forget you need to make your script executable with something like:

sudo chmod 700 rsync_upload.bsh

Also you’re going to want to test the RSYNC command using the -n (or –dry-run) option to make sure everything works the way you expect it to. You’ll also need to specify the -r (recursive) option because the –files-from directive overrides the implied recursion you get from the -a (archive) option.

Run your Script

So now when you’re done developing and testing files on your development server it’s simply a matter of running your new script to sync the files on your production server. Something like the following will run your script:

sudo /path/to/script/rsync_upload.bsh

Serving up Different Websites on My Local Network

I manage a number of different websites and most of the development has been done offline on a Windows 7 machine. I use the LAMP stack for all my sites and have always found the easiest method of setting up an equivalent WAMP stack on a Windows 7 machine was using XAMPP by Apache Friends. This has always worked fine but was a bit clunky when I wanted to change which website I was working on. It meant killing the Apache processes (httpd.exe) in the Windows task manager, editing the Apache conf file to change which site I was working on and then re-starting Apache. And when crap programs like Skype keep grabbing port 80 restarting Apache is always a pain in the butt.

There had to be an easier way so this week I took an hour out of my day to work out what it was. I already had Apache installed on my mini file server that runs Ubuntu so it was just a matter of getting that to work properly to serve up different sites. And that was (surprisingly) simple.

Edit the Hosts File on the Server

First step was to edit the hosts file on the linux machine with

sudo nano /etc/hosts

And then add entries for the sites I wanted to be served up locally. So, my hosts file ended up looking something like this:

127.0.0.1       localhost
127.0.0.1       local-site-1
127.0.0.1       local-site-2

Create Sites Available Files

I then had to create files for each site to sit in Apache’s sites available directory (/etc/apache2/sites-available/)

These files are pretty simple and in my case looked like this:

<VirtualHost *:80>
    ServerName local-site-1
    DocumentRoot "/srv/path/to/local/site/1/html_root/"
</VirtualHost>

Just change the server name to your local site name and the DocumentRoot to the path where the files for the site reside. In my case DocumentRoot is a SAMBA directory that is accessible from my windows machines (so I can edit the files from my dev machines). Name each file sensibly (in my case I named them local-site-1 and local-site-2).

Enable Sites and Reload Apache

Enabling the new sites is simple, just use the following command:

sudo a2ensite /etc/apache2/sites-available/local-site-1

Then reload the apache configuration with:

sudo /etc/init.d/apache2 reload

Edit the Windows Hosts File

The final step is to edit the hosts file on the Windows machines you want to access the local sites. On Windows 7 this can be found in:

%systemroot%\system32\drivers\etc\

I opened this in Notepad and changed it to look like this:

127.0.0.1 localhost
192.168.2.3 local-site-1
192.168.2.3 local-site-2

Note that 192.168.2.3 is the IP address of my file server.

Now if I want to access one of these local sites in a browser I just need to type local-site-1 into the address bar and hey presto I see the local copy of the website served up by my file server. I love increased productivity!

Potential Improvement

One potential improvement to this process is to remove the need to edit Windows hosts files by installing a DNS server (like dmasq) that will resolve the local site URL’s into an IP address. Of course this would require changing the DNS settings on the Windows machines.

Trouble with Google Experiments

I’ve been using Google Experiments (GE) pretty heavily in the last year and the method it uses to send traffic to landing page alternatives has always confused me a little. So yesterday I did some searching and it turns out that GE uses a “multi-armed bandit” method a splitting up traffic between alternatives. Basically this means that each experiment starts with a short evaluation period when traffic really is split up 50/50 (or whatever percentage you choose). After the evaluation period that the conversion rates of both alternatives are measured and more traffic is sent to the higher converting page. This evaluation is carried out a few times a day and the traffic split is adjusted accordingly. The reasoning behind this is supposedly two fold:

1. It minimizes the effect on overall conversion for the period of the experiment if one of your alternatives is particularly horrible.

2. It can lead to a much faster 0.95 confidence result especially when one alternative performs much better than the other.

Figure 1 : Conversion Variation

Figure 1 : Conversion Variation

With low traffic pages (say 100 visitors or less per day) if one of the alternatives happens to have a really good first day or two then you can end up with 90% of the traffic going to that and 10% going to the other. And these really good and bad days DO happen, it’s the nature of random variation and small sample sizes. I often see pages that have average long term conversion rates of 15% having 2% or even 0% conversion days. In the figure above you can the light blue line shows the conversion rate of one of my landing pages over a 30 day period. The rate varies quite randomly between less than 5% to more than 25%.

So imagine the situation where the initially poorly performing alternative is getting just 10 or so visits per day and normally has conversion rates of <10%. It can easily be DAYS before it has another conversion. And each day Google is evaluating that performance and sending the the page LESS traffic. Often this is just 1-2 visitors a day. So failure is basically assured. [caption id="attachment_243" align="aligncenter" width="300"]Figure 2 : Traffic Distribution During Experiment Figure 2 : Traffic Distribution During Experiment[/caption]

The net result of this is that the last week or so of an experiment often virtually ALL of the traffic is being sent to one alternative if it happens to perform better in the first few days of an experiment. And I’ve now seen this a number of times. I haven’t done the math on it but looking at my results I’ve had experiments conclude with a winning result getting 10-20x the traffic of the failing result. You can see and example of this above. The winning alternative (the orange lines) showed a great conversion rate in the first few days which resulted in less and less traffic being sent the alternative (the pale blue line). In fact, for the last 10 days of the experiment the poorer performing alternative received almost no traffic. At the end of the experiment the winning result got 1244 visits for 281 conversions and the alternative got just 212 visits with 18 conversions. To my mind 212 visits just isn’t enough to be statistically significant and certainly not enough to declare a conclusive winner.

It turns out that there’s a an advanced setting buried in the Google Experiments advanced settings called “Distribute traffic evenly across all variations”. This is OFF by default and needs to be turned on to ensure that the experiment actually uses the 50/50 traffic split (or whatever % you choose). My feeling is that it’s hazardous accept the result of just one GE that uses the multi-armed bandit method. Especially for low traffic landing pages. Multiple experiments are required. Of course this should be true of any A/B test. I also think that if you’re evaluating low traffic pages then you should conduct your experiments using the true 50/50 traffic split and compare those with the multi armed bandit method.

As an addendum here’s someone who takes a contrary view to the rosy view presented by Google in the page I linked to above. The folks on Visual Website Optimizer do not think multi-armed bandit is better than regular A/B testing.