Author Archives: markn

About markn

Mark is the owner and founder of Timesheets MTS Software, an mISV that develops and markets employee timesheet and time clock software. He's also a mechanical engineer, father of four, and a lifelong lover of gadgets.

    Find more about me on:
  • googleplus
  • linkedin

Having Trouble Viewing Media on Your Sony Bravia TV?

If you’ve got a latish model internet-enabled Sony TV (we have a Sony Bravia KDL40HX750 TV) then you may know it can display media streamed from a compliant DLNA server. If you know this you probably also know that the Sony TV’s can be very picky about what media formats (specifically movies) they will and wont play. I’ve had some luck converting movies to different file formats but even with this solution I’d pretty much given up on watching streamed movies on the TV because it was just all too hard. So I’d been resorting to using my five year old WD Live Media Player with an external HDD plugged into it.

However, I’ve hit on a solution that has allowed me to watch almost any movie in any format on our Sony TV. I’ve setup a DLNA media server and downloaded the great app Bubble UPNP to our Nexus 7 tablet. Once the app is installed it’s just a matter of connecting it to our media server, choosing a movie to play and selecting our Sony TV as a rendering device. Once that is done and I press PLAY in the app by the magic of smoke and mirrors the movie starts playing on the TV. Fabulous.

Turning Your Headless Linux Machine into a DLNA Media Server

We have had a Sony Bravia KDL40HX750 TV for a while now. It’s a great TV and can stream media from a compliant DLNA media server. I was doing this with Windows Media Player from my dev PC but given that my dev machine is usually turned off after 9PM it wasn’t used much. So, given that my My mini-ITX file server had been running nicely for a week or so I figured it could become the new media server for the house. Here’s how I got it working.

1. Mount an External HDD

The first problem was to mount an external USB disk drive to hold the media. And I wanted it to mount to the same point every time it was unplugged and plugged back in. This was fairly simple. Firstly, we need to work out the UUID of the USB drive we want to use. Run:

sudo blkid

And you should see something like that shown below. Our USB drive is on the bottom line,

/dev/md1: UUID="a20f7307-fb20-4c92-95d2-db222778af8f" TYPE="swap"
/dev/md0: UUID="c4c0ea5f-0613-4acc-8fa5-4d5968802771" TYPE="ext4"
/dev/sdc1: UUID="AE884FDE884FA425" TYPE="ntfs"

Once you know the UUID open up /etc/fstab in your text editor of choice and add an entry that looks something like this:

UUID=AE884FDE884FA425 /media/mediadrive ntfs defaults 0 0

Save those changes. Then create a mount point for your mediadrive using something like:

sudo mkdir /media/mediadrive/

Then reboot your machine and you should find that fstab mounts your USB drive to /media/mediadrive

2. Install and configure minidlna

There’s a number of DLNA compliant media servers for Linux. I chose minidlna because it was small and seemed to just work. Install it with:

sudo apt-get install minidlna

Then open the minidlna.conf file with:

sudo nano /etc/minidlna.conf

And configure to suit. I left most settings as is but you’ll need to set the path to your media drive, the network interface, and give your media server a name for devices to use when they connect to it. Here’s what those settings look like:

media_dir=/media/mediadrive
network_interface=p4p1
listening_ip=192.168.2.3
friendly_name=EinsteinJR

I note that there’s a web interface to manage minidlna but I haven’t taken a look at that.

Save the config changes and then restart minidlna with:

sudo service minidlna restart

3. Refresh Your Media LIbrary

By default minidlna refreshes your medial library every 895 seconds (controlled by the notify_interval setting in the conf file). However, if you’re impatient you can force a refresh with:

sudo minidlna -R
sudo service minidlna restart

Alternatively you can force the database refresh using:

sudo service minidlna force-reload

Once your library is refreshed you should see your new server available from your media device and be able to view your movies or listen to your music.

fancontrol Not Working after Resume from Hibernate

I setup fancontrol and lm-sensors on our new mini file server yesterday. I did it by following this fanspeed how-to article. However when I got up this morning after the server running Ubuntu had automatically woken from hibernation the fan was spinning at max RPM. I suspect it had reverted to manual fan control. This was fixed easily enough with:

sudo service fancontrol restart

But I don’t want to be doing that every morning. A bit of Googling suggested that this was a bug of unknown origins. There doesn’t seem to be any real fix so I decided on a work-around. This meant simply running a script when the file server resumed from hibernation. To do this I just created the following script in /etc/pm/sleep.d/20_fancontrol

#!/bin/sh

PATH=/sbin:/usr/sbin:/bin:/usr/bin

case "${1}" in
    resume|thaw)
      service fancontrol restart
      ;;
esac

Then I made the script executable with

sudo chmod +x /etc/pm/sleep.d/20_fancontrol

I quickly tested this with:

sudo rtcwake -u -m disk -t 09:00

And when the computer re-started the fan was spinning at the correct speed.

Building a New Mini File Server

So I completely lost confidence in our Mac Mini after the power surge issues and decided to build a new file server. I wanted something small and quiet built from standard components that would run Ubuntu server. I spent some time looking about and decided on the following build:

Case : Antec Mini ISK110 Vesa
CPU: Intel G2030 Pentium
CPU Cooler: Stock (if possible)
RAM: 4GB Generic
Motherboard: Gigabyte GA-H61N-D2V
Drives: 2x500GB 5400RPM 2.5″ laptop drives

Total cost was around AU$400. I ordered the case from an online vendor, the motherboard from eBay and the rest of the components were sourced from MSY Computers.

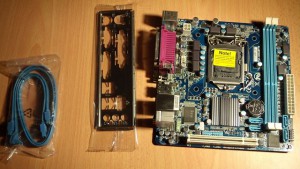
Gigabyte GA-H61N-D2V Motherboard

Gigabyte GA-H61N-D2V Motherboard

The mini-ITX format motherboard from Gigabyte (see above) shipped with a back plate and two HDMI cables. It has USB ports via the rear panel, has two RAM slots, 4 on-board SATA3 ports and supports any LGA1155 pin Intel PC. If the installed CPU has a GPU then there’s an available HDMI port too.

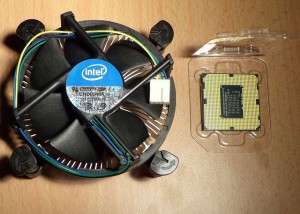
Intel G2030 Pentium and Stock Cooler

Intel G2030 Pentium and Stock Cooler

I chose the G2030 Pentium from Intel because it has on-board video, two cores, and a 55W thermal design load. And it was cheap. This is a file server so I didn’t see the need for excess CPU cycles. There’s a mobile version of the G2030 that has a TDP of 35W but that was more expensive and not available locally.

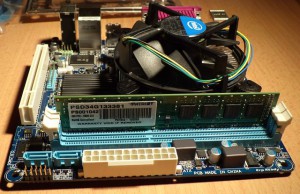
Motherboard with Installed CPU and RAM

Motherboard with Installed CPU and RAM

As I usually do I installed the CPU, fan, and RAM to the motherboard before the board went into the case. No issues here, everything went in smoothly. I was hoping the stock fan would fit in the small Antec case. If not I would have to purchase a low profile HSF unit like this Noctua unit. It turns out the stock fan DID fit and is very quiet at low RPM.

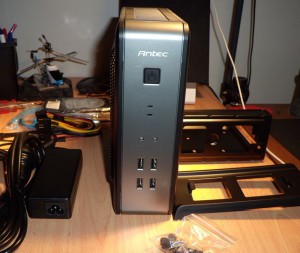
Antec ISK 110 Mini-ITX Case

Antec ISK 110 Mini-ITX Case

Above you can see the Antec case I chose. It comes with a 90W external power supply, has 4 USB2.0 front panel ports, has space for two 2.5″ drives internally and supports the mini-ITX motherboard format. It comes with a desk stand (which you can see on the right) and a VESA bracket so you could bolt it to the back of a monitor or TV. Ideal if you wanted a small format media PC or all-in-on PC solution. The case itself is about the size of a large format paperback novel. Quite a bit bigger than a Mac Mini but still very small.

Antec ISK 110 Mini-ITX Case Internals

Antec ISK 110 Mini-ITX Case Internals

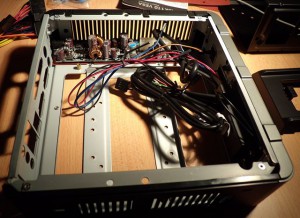
Here’s the guts of the case. The cables on the right are all for the front panel. At the top is the PSU.

Motherboard Installed

Motherboard Installed

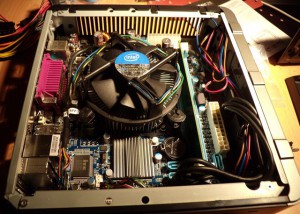
The motherboard went into the case without too much trouble. The front panel cables are stiff and impede on the area where the mother board wants to sit. So they need some bending to move them out of the way. Also, the back panel insert needs to be removed to fit the motherboard but it’s easily replaced with the back panel that shipped with the motherboard.

Back Panel

Back Panel

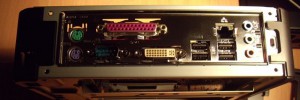
Here’s the back panel. The usual array of connections are available.

HDD Cage

HDD Cage

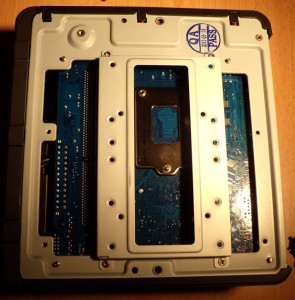
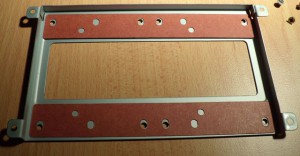
The cage for the two internal HDD’s is on the back of the case. In this image the cage is in the center of the image and attached by a screw at each corner. It was simply a matter of removing the cage and applying the included adhesive anti-vibration pads. You can see what this looks like below.

HDD Cage with Anti Vibration Pads

HDD Cage with Anti Vibration Pads

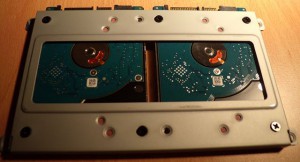
My two 2.5″ hard disks then simply screwed into the cage with the screws that were included with the case. The only issue here was to ensure that the drives were aligned correctly so that power cables and SATA cables could be routed easily to the drives.

Hard Drives in Cage

Hard Drives in Cage

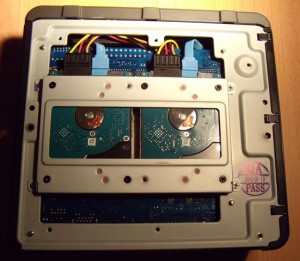
Once I’d screwed the cage back to the case and routed the SATA cables and power cables from the front of the setup looked very neat indeed. You can see what it looked like below. My only comment is that you’ll want two SATA cables with 90 degree bends on one end to make the job of connecting up the drives as easy as possible.

Hard Drive Installation Completed

Hard Drive Installation Completed

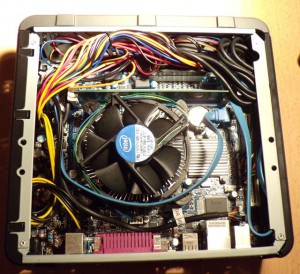
The final step in the process meant flipping the case back over and finishing off the cabling to the motherboard. The ATX power supply harness was very rigid and needed some work to get it bent to the shape I wanted. Once I’d done that the rest of the cabling was easy enough. I managed to tuck away a lot of the cables in the edge of the case out of sight to neaten things up. You can see the final result below. One comment I would make here is that while the Gigabyte motherboard does have a PCI-E slot I would be dumbfounded if you could fit a card in this case. There just doesn’t seem to be enough clearance.

Cabling Complete

Cabling Complete

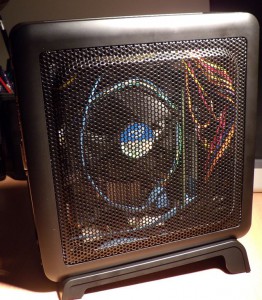
And here’s the final product with the sides of the case back on. Lot’s of ventilation means that it can run with the CPU fan idling away silently at 900RPM or so and there hasn’t been a need for a case fan at all. Admittedly it’s winter here and with room temperatures of less than 20 degrees Centigrade the CPU temperature has been sitting at about 40 degrees for several days now. I can wind the fan speeds up during the hotter parts of the year if needed.

Completed Teeny Tiny Computer

Completed Teeny Tiny Computer

I installed Ubuntu Server 13.04 on the machine and setup the disks in a RAID1 configuration. Installation was very smooth and without issue. I even had time to do a few experiments removing the disks to make sure the computer still booted and I could recover data from the degraded array.

Dealing Gracefully with Customer Price Objections

Every day I deal personally with emails from new users of my software, existing users, and prospective users. One topic that comes up from time to time is people complaining about the cost of the software (new users), the cost of upgrades (existing users), and having to pay for on-going technical support (existing users). Just because I don’t really get many emails like this (perhaps 1 a week, perhaps less) doesn’t mean I haven’t spent some time and effort working out the best way of handling them. Not surprisingly, I’m not the only mISV to have this problem as someone has been posting about it over on The Business of Software forum. Some of the advice contained therein is pretty good. Some of it (in my opinion) isn’t.

I thought I’d take a look at the best (and worst) responses in the thread. Thread responses are posted as is (no typos have been fixed).

You don’t owe an a customer a lower price unless you promised it. I’d tell the customer, as nicely as possible, that the price will remain as is, and that there may be other products that would meet that customer’s needs better

I like the first sentence of this response. As an mISV you do not have to honour earlier prices unless the customer has been promised access to the lower price. I do not like the second sentence. It’s basically encouraging the customer to look elsewhere. Effort should be made to retain the customer as every customer is a potential source of on-going revenue.

I would give your customer a discount coupon (say 50%) to make them happy and get the sale. Selling at a lower price is better than not selling at all and this is just a one-off. Your customer will be happy and maybe even recommend your software to others because of it. Plus it’s another person you can charge for upgrades in the future.

This is a decent approach. It makes an effort to keep the customer happy, it gives you an opportunity to secure a sale and cement a relationship with the user. It also suggests on-going intangible benefits such as word-of-mouth marketing. I’ve used this approach many times in the past and while I don’t have any hard statistics it does secure the sale in the majority of cases.

I wouldn’t offer him a discount at all — but I love standing my ground, and there’s nothing like sales being made at the higher price to prove that it’s the right price.

Admirable and pointless. If you’re an mISV then your likely to want every sale you can get. If you’re selling dozens of licenses a day then a few lost sales are not likely to bother you. The only time I’d completely dismiss a potential sale like this is if the customer has proven to have a high cost of ownership and that it would be more cost-effective for you to fire that customer than retain them. Out of the 10,000 odd companies that use my software I’d guess I’ve “fired” a customer perhaps 10 times. So the customer would have to be exceptionally bad to want to write them off.

Never do anything for free.

Ask the user if they would be willing to send you a postcard from or pictures from their location in return for a discount.

I like this suggestion. It hearkens back to the postcard-ware days of software and forces the customer to do something in return for the discount. Thus it forces them to assign a personal value to receiving the discount. My only suggestion is that while making the customer do something is great I do not think that receiving the postcard is something that benefits the business long term.

I think the best way to handle this is just to politely write back the customer and say something like, “The truth is that the product isn’t sustainable at the cheaper price. The revenue does not yet cover the development cost, so I have to make more money. My strategy is both to slowly drive up the value (and price) of the product by adding more features, and to slowly expand the potential market and audience for the product with those additional features. “

There’s a few posts that suggest something along these lines. This is a terrible approach. You do not need to reason with your customers nor provide them with a story about your business. In most cases they simply won’t care. After all, as a business owner you don’t particularly care about why the customer wants your product cheaper so why on earth would they care why you want more for it?

Ask them for a 300 word testimonial about how they use your product and why they find it useful. Ask for permission to publish it on your website along with their name and a link back to their website. If they comply give them access to the old pricing.

Full disclaimer. That’s my response and (not to blow my own trumpet) it’s the best one in the thread. It demands some effort on behalf of the customer to get the discount, it gives the mISV some material that will help build credibility when it is published on their website, and it helps to secure an on-going relationship with the customer. And does it work? Absolutely, I’ve been very forward with with my users in the last 12 months asking for testimonials. And you know what? Almost all of them have been absolutely happy to provide one and allow me to publish it with their full name. It’s by far the best way of handling customer price objections gracefully.

Suspending Ubuntu on a Mac Mini and Automatically Restarting

I want my Mac Mini with Ubuntu 13.04 Server installed on it to automatically suspend and re-start early in the morning. It does nothing all night so I didn’t see the point of it sitting there drawing power the whole time. So, how hard could it be I wondered? We’ll it turns out it was surprisingly easy. Before I did anything I wanted to make sure that the Mac could be suspended successfully. I did this easily enough with pm-is-supported:

pm-is-supported --suspend && echo "suspend is supported" || echo "suspend is not supported"

Happily enough that reported back that suspend is supported. After a bit of Googling and I came up with this page on Ask Ubuntu. I pretty much followed the instructions verbatim by creating the suspend_until script and adding a cron job to trigger it.

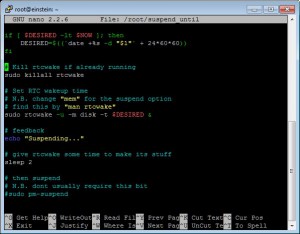
The suspend_until script in nano

The suspend_until script in nano

I made two changes to the script (which you can see above). The first was to use to use the -u flag on the rtcwake call because it turns out the real time clock in the Mac uses UTC time. The second was to use the disk rather than the mem suspend option. My reasoning was simply that a disk suspend is recoverable case of an extended power failure while a mem suspend is not. And here’s the CRON entry I made to suspend the Mac at 10:00PM each night and start up again at 6:30AM.

00 22 * * * /root/suspend_until 06:30

Installing Ubuntu on a Mac Mini

A I mentioned in a previous post we had some power surge issues here recently. And our file server, a 2011 vintage Mac Mini called “Einstein” was one of the victims of the the surge. I don’t want to talk much about the accredited Mac repair shop that tried to repair the Mac Mini. But suffice to say, they didn’t. They did replace one of the HDDs and tinker with it a bit. And I gave them some money for doing so. The result of this was that three weeks after the power surge I was lighter in the pocket and had a Mac Mini that supposedly worked fine yet would crash repeatedly when sitting on the desk in my office.
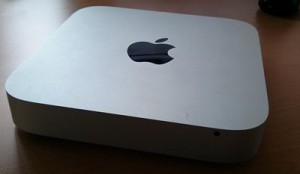
Einstein - A 2011 Mac Mini with 2GB of RAM and dual 500GB Hard Disks

Einstein – A 2011 Mac Mini with 2GB of RAM and dual 500GB Hard Disks

I needed the Mac Mini working or failing that, something else. Something to act as a file server and something with a Unix based operating system on it so I can run CRON jobs and do various other things. So, I decided to have one last go at getting “Einstein” working. And this time I decided on something drastic. Ditch MacOS 10 and try installing Linux (namely Ubuntu server) on it. There were three reasons for this. Firstly, the Mac repair place assured me they could find nothing wrong with the hardware in the computer so presumably there was something wrong with the OS. Second, I am moderately comfortable with Ubuntu server because it’s what’s running on my managed web servers. And finally, I hated MacOS 10 Server with a passion. The GUI is awful and I always found myself dropping to the command line to do things.

So, no guts, no glory. Let’s install Linux on the Mac.

1. Create a Bootable USB Drive

Einstein is a dual 500GB HDD Mac Mini with 2GB of RAM and no optical drive. So, the only sensible way of getting an OS on it was via a USB stick. I grabbed a spare 8GB stick, downloaded Rufus and created a bootable stick using the ISO I had of Ubuntu 12.04 LTS. Putting the stick into the back of the Mac I held down the left ALT button on my keyboard and booted it up and was shown the boot device menu. There I could see both internal hard disks which were setup in a bootable RAID 1 array. But no USB stick. Bother. A bit of Googling later and I’ve found out Mac Mini’s don’t have BIOS they have UEFI to link their software and hardware and therefore they require a bootable USB stick to be setup for a UEFI computer.

Rufus provides a few options for the partition scheme and the target computer type, one of which is GPT Partition Scheme for UEFI computer. I selected this option and tried to build the USB stick again but Rufus complained with the following message:

“When using UEFI Target Type, only EFI bootable ISO images are supported. Please select an EFI bootable ISO or set the Target Type to BIOS”
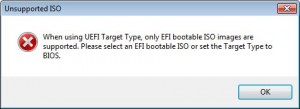
Rufus Doesn't Like the Ununtu 12.04 ISO

Rufus Doesn’t Like the Ununtu 12.04 ISO

Off to the Ubuntu website I go and download Ubuntu Server 13.04 which it says supports UEFI computers. I rebuilt the USB stick, rebooted the Mac to the boot device menu and hey presto there’s my USB stick! Victory!
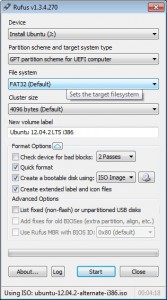
My Rufus Settings

My Rufus Settings

2. Boot the Mac Mini to the boot device menu

This is simple, just boot up the Mac Mini and hold down the left ALT key. After a brief pause you’ll be shown the boot device menu which looks something like that shown below.
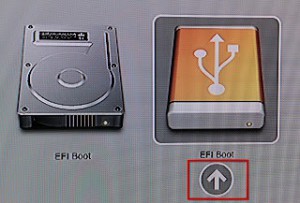
Mac Mini Boot Device Menu

Mac Mini Boot Device Menu

The EFI boot option was my USB stick. I clicked on that and booted into the Ubuntu installer.

3. Install Ubuntu Server

I won’t take you through the entire process of setting up Ubuntu server on the Mac. I encountered a few snags on the way that were almost all to do with getting the two 500GB disks working in a RAID 1 format. The Ubuntu install script does an admirable job holding your hand through the raid setup process (this is the first time I’d ever done it) but there were a few hiccups along the way.

The first, was that one of the disks just wouldn’t be setup with a UEFI boot partition. It just refused. I don’t know if some HDD’s only allow MBR boot partitions or not. But one of these HDDs just got persnickety and refused to cooperate. So, after much fiddling about I ended up with the following partitions on the drives.

HDD1 (/dev/sda)

100 MB UEFI Boot Partition
50GB ext3 partition mounted as root
400 GB raid partition
50 GB swap partition

HDD2 (/dev/sdb)

400 GB raid partition
100 GB ext3 mounted as /usr

I setup /dev/md0 as my raid array using the two 400GB partitions as the members of the array and mounted /dev/md0 as /srv.

This solution isn’t ideal because if /dev/sda goes down I won’t be able to boot the Mac as I couldn’t make /dev/sdb bootable. But that’s not the end of the world. I can still boot it up via my handy USB stick and get the data off of the drive onto an external HDD if needed.

4. Give the Mac a Fixed IP

Now I needed to get Einstein on the network. I wanted to give it a fixed IP. So I used:

sudo nano /etc/network/interfaces

And changed the settings for eth0 from dhcp to the following:
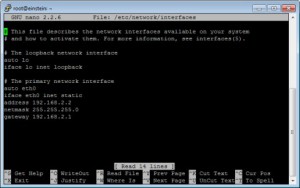
Einstein's Interfaces File in a PuTTy Session

Einstein’s Interfaces File in a PuTTy Session

Then it was a matter of restarting the networking process with:

sudo /etc/init.d/networking restart

5. Setup a Simple Windows Share

As part of the install process for Ubuntu I’d chosen to install Samba. Now it was just a matter of setting up a simple share of my RAID array to allow the Windows PC’s on my network to access Einstein. Here’s how I did that:

sudo nano /etc/samba/smb.conf

Then change

workgroup = myWorkGroupName
security = user

And add this entry at the bottom of the file:

[share]
comment = Einstein File Share
path = /srv/windows-share/
browsable = yes
guest ok = yes
read only = no
create mask = 0777

Save those changes, exit the text editor and then enter the following:

mkdir -p /srv/windows-share/
chown nobody.nogroup /srv/windows-share/
restart smbd
sudo restart nmbd

Once I’d done that it was simply a matter of going to a Windows PC and typing:

\\Einstein\

into Windows explorer and I could see the new shared drive.

6. Setup a GUI for Ubuntu Server

Next I decided to install a GUI for the new server. And surprised I was to read that only wimps have GUI’s on their servers. But hey, I am a wimp, and I like to have multiple terminals open. I went ahead and installed lightdm which is the default GUI and display manager for Ubuntu. I did it with this:

sudo apt-get install ubuntu-desktop

However, I experienced a lot of graphical glitches with this. Perhaps it’s not fully supported on the video card in the Mac. Who knows. I got around it by installing another display manager with:

sudo apt-get install xdm

When I started the GUI next time Ubuntu asked me if I wanted to use LightDM or XDM. I chose XDM and the GUI has worked fine ever since.

For those that are interested you can exit from the GUI using CTRL-SHIFT-F1. And if you want to restart the GUI just enter

sudo /etc/init.d/xdm start

Conclusions

I don’t trust Einstein just yet. It’s been up and running for 48 hours without issue but I don’t want to trust my files to it just yet. Right now it’s running some CRON jobs in tandem to my existing cobbled together file server. I’ve also got it syncing some files from my main PC to see how it goes doing that. I’ll let it do this for a week or so and use it to serve some live files for some of my less important tasks. Once I’m happy it’s working OK I’ll do a data integrity check on the files it’s holding. If it passes that then Einstein will be back in the good books and I’ll put it back into live operation again.

Other Useful Stuff

Here’s some other useful things I found out through this process.

To set the default text editor in Ubuntu (I can’t use vi or emacs) using:

sudo /usr/bin/select-editor

I know enabling su is a security risk but I got sick of typing sudo. So to enable su just use this:

sudo passwd root

New Tablet – Asus Google Nexus 7

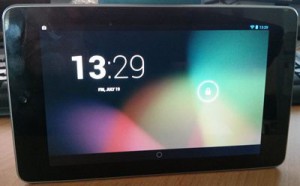
Google / Asus Nexus 7

Google / Asus Nexus 7

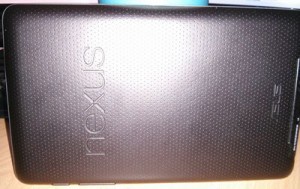
I’d been wanting another tablet for a while (I’ve had an iPad 1 for several years) and based on the good experiences I’ve had with my Google Nexus 4 phone I was quite happy to try out the equivalent Google tablet option. It just so happens that last week I walked past an electronics store with a hand-written sign on the door “Daily Special – Nexus 7 32GB $199 normally $279”. If ever a sign was a sign that I should adhere to the advice of a sign then that sign was it. In I went and bought myself a Google Nexus 7, manufactured by Asus and running Android 4.2.2 (Jelly Bean). You can see what the Nexus 7 looks like above. There’s a camera in there, but it is only 1.2 mega pixels so don’t expect anything special from it. The back of the unit is covered in a textured plastic material (see below) emblazoned with the Nexus and Asus logos.

Back of the Nexus 7

Back of the Nexus 7

Given that Android uses soft buttons at the bottom of the display the actual hardware controls are somewhat sparse. Just two buttons, a volume rocker and a power switch (see below) can be found at the top right side of the unit.

Volume / Power Buttons

Volume / Power Buttons

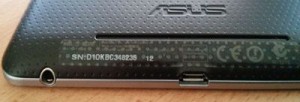
At the bottom of the Nexus you can find a mini USB port, a headphone jack and just round the back a cut-out for the internal speaker. You can see these below.

Headphones / USB / Speaker

Headphones / USB / Speaker

OK. So what’s it like? My first impressions are that it’s a much more manageable size that a 10″ tablet (like an iPad). I can mostly use the Nexus 7 one-handed and it’s quite comfortable to do so. The textured reverse of the unit is nice to grip onto and doesn’t get tiring if you’re using it for an extended period. Visually it’s inoffensive but if I had one comment it’s that the 7″ screen looks rather skimpy inside what is a wider than expected black frame. But I suppose there has to be somewhere to hang onto it!

Given that the tablet uses the same OS as my Nexus phone I settled into how the tablet works almost instantly. There’s some very minor differences in the way the Google app icons are grouped and the way the tablet information slider that is always available at the top right of the screen works. And the wider screen allows for more app icons across the bottom of the screen (they are lined up the side of the screen in landscape mode). In any event, the differences are minor and anyone who has used a device with a fairly vanilla install of Android 4.2.2 will be right at home. The software itself is quite responsive so whatever processor is in the Nexus is up to the job. If I had one quibble it’s that things just don’t seem quite as polished as they are on my 4 year old iPad. Scrolling isn’t quite as smooth, sometimes I need to poke at on-screen buttons more than once, and the location of the settings button in various apps seems to change with little rhyme or reason. Clearly the people looking after iOS run a much more rigid development system than the Android people.

There’s no native flash support in Android 4.2.2 so if you’re wanting to watch videos online you’re going to need to download a browser with Flash enabled natively (like Dolphin) or sideload Flash and install Firefox. But, even when I’d done that Flash support was flaky. For example, I could get SBS On Demand working but still haven’t had any luck with ABC iView.

I’ve had this unit for a week now and I’m happy with it at the price I paid. If I’d paid full asking price I’d be much less impressed (actually I wouldn’t have it at all). Recent media reports suggest tablets of this size are likely to see price drops in the near future so I’d hold out to get a Nexus 7 at a discounted price if possible. It’s ideal if you’re after a small form tablet, want to keep away from the Evil Apple Empire, and don’t want a tablet loaded down with pre-installed crap software. So what do I think of the Google Nexus 7? At the price, it’s hard not to like it. Go get one.

New IP Phone – Gigaset C610A IP

Our ISP offers a free VOIP service along with providing access to (pretty crappy) ADSL. We had an old VOIP box (an Open Networks 812L) sitting in a box that used to work but despite my best efforts I’ve been unable to get it working again. Cue my recent power problems and once I’d sorted those out I thought it was time to have one more go getting the 812L to work.

A couple of hours later and I’d failed. No matter what I tried I just couldn’t get into the web management console for the device because I couldn’t work out what the IP address of the device was. I dimly remember that the device had an in-built DHCP server so I even plugged it into a laptop in the hope it would give the laptop an IP address. Fail. Installed a port scanner and tried to determine the IP address that way. Fail. OK, pressed the hard reset button on the 812L…..and that did exactly nothing. So I gave up in disgust and consigned the unit to the bin.

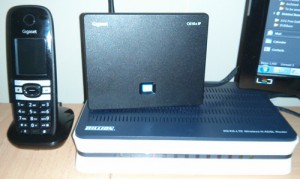
The next step was to spend 20 minutes reading some VOIP oriented forums and looking at the IP phones that my ISP supported. Based on what I’d read and what my ISP supported I decided on a Siemens Gigaset C610A IP. This is a DECT IP phone with a built in answering machine (that’s what the A in the model number means). It allows you to use two different VOIP lines AND the standard analog line. I bought one for about $190 (can anyone say Australian rip-off….they can be had for half this price in the USA) and a few days later the phone showed up. Here’s what it looks like on my desk:

The Siemens Gigaphone C610A IP Phone

The Siemens Gigaphone C610A IP Phone

The box the machine came in included the handset, the charging base for the handset, the base unit, a belt clip for the handset, some rechargeable AA batteries, two power units, a skimpy instruction manual and a CD of software they never expect anyone to use. The base unit plugs into a router and into the phone line. The handset / charger can sit anywhere I’d imagine. Setting up the unit was a doddle. Once I’d plugged the base unit into my router it grabbed an IP address and informed me via the handset that it wanted to download a firmware update. This was done in a few minutes. Then it was simply a matter of logging into the web management console of the phone and entering my ISP assigned IP phone number and passwords. 5 minutes later it was all done and I could make calls. The voice quality of which were excellent.

The handset seems to be nicely designed as does the software it runs. The handset offers much online integration to services like eBay, Facebook and news/weather services. I am not sure how much use these would be with the titchy little colour screen but I guess some people *might* use them. The unit also has the usual myriad selections for ringtones and message tones. There’s also the capability to assign different tones depending on the phone call source (for example from different VOIP lines and the analog phone lines). I’ve not spent too much time playing with this side of things though.

Given my recent run of bad luck with hardware this phone has been a pleasant surprise. I felt cheated somehow that it only took me 10 minutes to get it working and was sure it was going to be harder. But it wasn’t. So, the Gigaset C610A IP phone is, for ease of setup alone, highly recommended.

New UPS – APC Back-UPS ES700

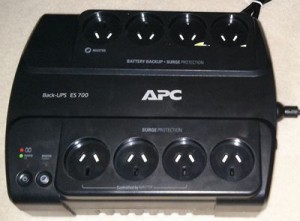
APC UPS ES700

APC UPS ES700

In light of my recent power surge woes I’ve gone ahead and bought a UPS. The chosen unit is an APC 700VA ES700. This unit comes with 8 plugs, 4 of which are surge protected and can run from battery power. The other four are just surge protected. I chose this unit because the capacity of 700VA should be enough to keep my file server, my router, my main PC and one monitor active for several minutes in the case of a power interruption. Long enough for me to save my work and gracefully shut down my file server and PC. The battery in the UPS is user-replaceable too which is handy a few years down the track when the battery is shot.

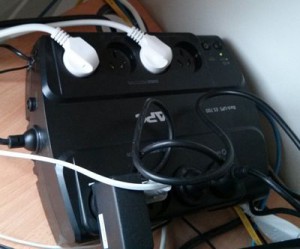
The unit was around $150 and weighs about 8 kilograms. It’s small enough to sit behind my monitors for easy access. The only real set up required was to connect the terminal for the battery and to charge it for 16 hours before usage. Once I’d done that I plugged my PC, a monitor, the router and file server into the UPS enabled plugs. The surge protected plugs were connected to a couple of powerboards that run the rest of my monitors, my partner’s PC, and the network printer. I can verify that the UPS works as advertised because the power happened to flicker on and off not 12 hours after I inserted it into my systems. The unit doesn’t make any noise when operating normally but I did note a hum when the unit was operating from the batter.

There’s a feature of the APC ES-700 that I didn’t use. One of the UPS enabled powerpoints can act as a master and three of the surge protected points can slave from this. When the master is off all power to the slaved powerpoints is stopped, allowing users to save on stand by current draw. This could be ideal if you wanted to use the UPS in your home theater. You could (for example) assign your TV as the master and slave your PVR and hifi system off of that. The documentation also mentions being able to tune the UPS for the current draw of your master device. Seems like a handy feature.

APC UPS ES700 In Use

APC UPS ES700 In Use