Author Archives: markn

About markn

Mark is the owner and founder of Timesheets MTS Software, an mISV that develops and markets employee timesheet and time clock software. He's also a mechanical engineer, father of four, and a lifelong lover of gadgets.

    Find more about me on:
  • googleplus
  • linkedin

GZIP Compression and WordPress

I had an issue back in November 2014 trying to enable GZIP compression with WordPress. A spare half an hour was found last week that allow me to solve the problem. I resorted to a .htaccess file change. I simply added this to the top of the .htaccess file:

# BEGIN GZIP
<ifmodule mod_deflate.c>
AddOutputFilterByType DEFLATE text/text text/html text/plain text/xml text/css application/x-javascript application/javascript
</ifmodule>
# END GZIP

Now the WordPress site is being delivered to clients in GZIP format. This results in a significant speed improvement in page rendering as well as a significant decrease in the bandwidth my server needs to deliver. Furthermore, it’s superior to the ob_gzhandler method suggested by WordPress themselves because CSS and javascript files are compressed as well as the HTML. The ob_gzhandler method appears to only compress the HTML.

Filter Posts from Tag Archives in WordPress

I’ve been using a commercial WordPress plugin to manage customer testimonials for one of my products. One of the features of the plugin is a tag cloud. The cloud is generated from tags for each testimonial. I’ve used the tags to produce industry specific archives of customer testimonials, which is great for SEO purposes. However, in some cases I’ve created multiple testimonials for the same customer, allowing me to use a short extract or a sentence or two on a landing page rather than having to use the entire testimonial. This resulted in duplicate testimonials from the same customer appearing in the testimonial tag archives. I needed to find a way from stopping this. Here’s how I solved the problem.

First, I added a custom meta field to each duplicate testimonial that I didn’t want to appear in the tag archive. That looks like this:

Defining a Custom Meta Tag

Defining a Custom Meta Field

Given that the testimonials are custom post types I could filter the testimonials from the tag archives by testing for the existence of the new meta field (in this case I called it testimonial-widget-hide-on-tag-archive). The actual value you assign to the new meta field doesn’t matter. We just want the field to be present for the testimonials we do not want to display on the tag archives. To do that I needed to add an action to the pre_get_posts event and add a filter for the new meta key. Here’s the code I added to my functions.php file:

function modify_testimonial_tag_archive_query( $query ) 
{
	if (is_tag() && $query->is_main_query()) 
	{
		$meta_query[] = array(
                    'key'=>'testimonial-widget-hide-on-tag-archive',
                    'compare'=>'NOT EXISTS',
                );	
		$query->set('meta_query',$meta_query);
  }
}
add_action( "pre_get_posts", "modify_testimonial_tag_archive_query" );

Some key things to note here are the use of is_tag() to check that the query is tag based. Then the use of the $query->is_main_query() call to make sure the filter is used for the main query only (the one that works out what posts to display). The $meta_query array is used to put in the key for the new meta field for the posts we created above, and then we’re using the NOT EXISTS comparison. The result of all this is that only posts that DO NOT have the meta value testimonial-widget-hide-on-tag-archive will be displayed on tag based archives.

Renewing my Namecheap SSL Certificate on Linode Apache2 Web Server

This post is something of a reminder to myself. How to renew a NameCheap Comodo SSL certificate on one of my Linode Apache2 web-servers. It’s something I only have to do every few years so I essentially have to re-learn the process every time which is rather tiring. This post will be here for my future self to make the process easier.

1. Renew the SSL Certificate on NameCheap

I use NameCheap for all my domain name registrations and SSL certificates. They have many different types of SSL certificates available from several different providers ranging from simple domain certificates right up to full wildcard organization based certificates. The great thing about any of them is that NameCheap will email you well in advance of them expiring. When they do so it’s simply a matter of logging into your NameCheap control panel and renewing the certificate. A new entry will be created with the status of “Waiting Activation”.

2. Create the CSR File

My host runs apache2 on Ubuntu and OpenSSL. Apache looks for certificates in /etc/apache2/ssl and I usually create a sub-folder for new CSR and key files when the old ones expire. I feel its a bit more secure to generate a new Certificate Signing Request (CSR) whenever a certificate expires, which is why I do this. So I create a folder for the files:

cd /etc/apache2/ssl
mkdir december-2014
cd december-2014

Then create a CSR file using:

openssl req -newkey rsa:2048 -days 1095 -nodes -keyout www.my-domain.com.key -out www.my-domain.com.csr

The openssl req command will then ask for some information to encode with the request. That looks something like below. Make sure when entering the FQDN that you enter the bare domain (ie no www).

You are about to be asked to enter information that will be incorporated
into your certificate request.
What you are about to enter is what is called a Distinguished Name or a DN.
There are quite a few fields but you can leave some blank
For some fields there will be a default value,
If you enter '.', the field will be left blank.
-----
Country Name (2 letter code) [AU]:AU
State or Province Name (full name) [Some-State]:South Australia
Locality Name (eg, city) []:Adelaide
Organization Name (eg, company) [Internet Widgits Pty Ltd]:My Company Name
Organizational Unit Name (eg, section) []:
Common Name (eg, YOUR name) []:mydomain.com
Email Address []:admin@mydomain.com

Please enter the following 'extra' attributes
to be sent with your certificate request
A challenge password []:
An optional company name []:My Company Name

This will create the CSR file (www.mydomain.com.csr) and a SSL certificate key file (www.mydomain.com.key). The key needs to be protected with:

chmod 400 www.mydomain.com.key

3. Issue the SSL Certificate via NameCheap

The contents of the CSR file are needed to issue the SSL certificate via the NameCheap control panel. View the contents with:

more www.mydomain.com.csr

The contents will look something like this:

-----BEGIN CERTIFICATE REQUEST-----
123DQDCCAigCAQAwgbAxCzAJBgNVBAYTAkFVMRgwFgYDVQQIEw9Tb3V0aCBBdXN0
cmFsaWExETAPBgNVBAcTCEFkZWxhaWRlMSAwHgYDVQQKExdUaW1lc2hlZXRzIE1U
UyBTb2Z0d2FyZTEkMCIGA1UEAxMbd3d3LnRpbWVjbG9ja210cy1vbmxpbmUuY29t
MSwwKgYJKoZIhvcNAQkBFh1hZG1pbkB0aW1lY2xvY2ttdHMtb25saW5lLmNvbTCC
ASIwDQYJKoZIhvcNAQEBBQADggEPADCCAQoCggEBAOeLw456FYT+reZ8VH2PFD6B
pxk4NGHczMeAajXVabF/O+KBTqveBeqCEoXQzPO7Z4rovVdNJp5z06t54mOmILue
pENONp7mmfLMaPrvPrunOzdCo1ltoegNhQh+SYK0gY2SoMA69hEm2jgDL9umBueY
7kSCa/p0p7znZWCxt1yFf/5VhKVgXgh0C+6PD9VJp4nEBYcVSwOlbuHi1gsCFmwb
DXOpU6vAK61Ot43AaOdWGN8Aao9GqvMPDyV1hW0GcH/WCyAD19u5YUSz2jZP9qnc
MP1IhDD2smz24qkdZD8/LwPusEnAILL8HVp3z5v+4FMAVHWWNGj6X+ZgNQYPlFUC
AwEAAaBKMCAGCSqGSIb3DQEJBzETExFzb2dneWhvcnNlYmlzY3VpdDAmBgkqhkiG
9w0BCQIxGRMXVGltZXNoZWV0cyB789MgU29mdHdhcmUwDQYJKoZIhvcNAQEFBQAD
ggEBAIj4cddghuRyEGcJvSzsdarfaIHIUHUUN9kc9udsqS0pNcnk0s4xBMz2E72R
0ArwP43QBAiA8x8aganbqcj5WB+bDhasTDCBlOomeplQJ4LsYwdd2geMTxrxsoaq
VXc5TaS9Ct+vGqDIg+tQmd8PbGk2m3zzGFeacGn42xnRGBxe21eSmkMo4yPF7KZl
h/M5l6kZFhejSSM+jyvXqMaRjX4gtQxloXisUxiyxO2mSA5gc0p4/tJ+oC1Dj3mw
rE3EYcoOi1XkAcuflLhp/YN4COd/TkH5DwwKCMJOvmuWdqurxjXIqlxlBchqb9Ml
SXCA5yk12345678wOayT2/kQJG0=
-----END CERTIFICATE REQUEST-----

Copy the contents to the clipboard and go to your NameCheap control panel and select the SSL certificate to activate. Select the correct server configuration (in this case Apache2 + OpenSSL) and paste the contents of the CSR file into the CSR Text field and submit the activate request. NameCheap will then ask for an email address to confirm the issuing of the SSL certificate for the domain. Confirm the request and next you’ll have to confirm that you actually own the domain. Namecheap offers three alternatives for this, file validation, DNS validation and email validation.

File Validation

File validation involves downloading a file from Namecheap and uploading it to the /.well-known/pki-validation folder of your website. You must make sure that the file is accessible from both the naked and www addresses of your website for this validation to complete properly. This means disabling any non-www to www redirects. This is OK if you’re not running WordPress, but if you are running WordPress this can be difficult. If you are running WordPress I’d suggest using Domain or Email validation.

DNS Validation

DNS validation involves creating a CNAME DNS entry for the domain you want to validate. The CNAME entry is available from Namecheap. This is the best approach for WordPress websites if you do not have emails available.

4. Confirm the SSL Certificate Issue

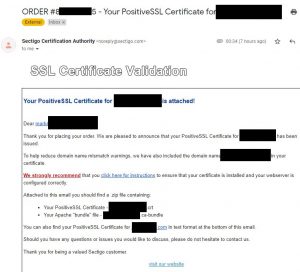
The SSL certificate I renewed was a Comodo certificate and after a few seconds I got an email from Comodo asking me to confirm the issuing of a certificate. The email looked like this:

Comodo Confirm Issue SSL Certificate Email

It’s simply a matter of clicking on the confirmation link in that email and pasting the “validation code” into a text box on the resultant web page. Once you’ve done that another email will arrive in a few minutes with a ZIP file attached. The zip file contains the following files:

Comodo SSL Files

Comodo SSL Files

The AddTrustExternalCARoot.crt is the CA (certificate authority) root certificate which identifies the company we’ve paid to issue the SSL certificate. In this case, Comodo via NameCheap. You’ll need that file. You’ll also need the www_mydomain_com.crt file which is the signed CSR.

5. Install and Protect Certificate File

Both files mentioned above need to be copied to the folder we created in step 1, namely:

/etc/apache2/ssl/december-2014/

Once there protect the signed crt file with:

chmod 400 www_mydomain_com.crt

6. Configure Apache to use New SSL Certificate

The last step in the process is to configure Apache to use the new SSL Certificate. Open up the site configuration file with:

nano /etc/apache2/sites-available/site-name.conf

In my case I looked for the SSL VirtualHost section of the file which looked like this:

<VirtualHost  222.222.222.222:443>
    SSLEngine On
    SSLCertificateFile /etc/apache2/ssl/december-2011/www.mydomain_com.crt
    SSLCertificateKeyFile /etc/apache2/ssl/december-2011/www.mydomain.com.key
    SSLCertificateChainFile /etc/apache2/ssl/december-2011/www.mydomain.com.ca-bundle
    ServerName www.mydomain.com
    ServerAdmin general@mydomain.com
    ServerAlias mydomain.com
    DocumentRoot /srv/www/public_html/
    ErrorLog /srv/www/logs/error.log
    CustomLog /srv/www/logs/access.log combined
    AddHandler cgi-script .cgi .pl
</VirtualHost>

You can see that the SSLCertificateFile SSLCertificateKeyFile and SSLCACertificateFile directives need to be changed to use the new certificate files. I modified them to look like this:

<VirtualHost  222.222.222.222:443>
    SSLCertificateFile /etc/apache2/ssl/december-2014/www_mydomain_com.crt
    SSLCertificateKeyFile /etc/apache2/ssl/december-2014/www.mydomain.com.key
    SSLCertificateChainFile /etc/apache2/ssl/december-2014/www.mydomain.com.ca-bundle

Saved the file, exited Nano and then reloaded Apache with:

service apache2 reload

8. Verify New Certificate is Installed

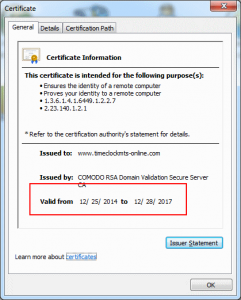
If you’ve done everything correctly it’s a simple matter of checking if the certificate is installed correctly. I did it by navigating to the website in Google Chrome and clicking on the https padlock icon and viewing the certificate information. It looked like the image below and you should see that the expiry date has updated correctly. Job done.

Success - SSL Certificate Installed

Success – SSL Certificate Installed

Visual Basic 6 – Disable Min Max Buttons and Movable Property at Run Time

Recently I had need to allow one of my old Visual Basic 6 applications to run in “kiosk mode”. That is, maximize the window to fill up the screen, disable the form Min button, Max Button, Close button, prevent form re-sizing, and form dragging. There are properties to allow this at design time (MinButton, MaxButton, Movable etc) but they cannot be modified at run-time. So the problem was to set these properties at run-time. There was a quite bit of information online about it but nothing that tied it all up. Here’s my solution.

Firstly, it’s all done via API calls so you need to define a number of those as follows.

Public Declare Function GetSystemMenu Lib "user32" (ByVal hwnd As Long, ByVal bRevert As Long) As Long
Public Declare Function DrawMenuBar Lib "user32" (ByVal hwnd As Long) As Long
Public Declare Function GetMenuItemCount Lib "user32" (ByVal hMenu As Long) As Long
Public Declare Function ModifyMenu Lib "user32" Alias "ModifyMenuA" (ByVal hMenu As Long, ByVal nPosition As Long, ByVal wFlags As Long, ByVal wIDNewItem As Long, ByVal lpString As Any) As Long
Public Declare Function GetMenuString Lib "user32" Alias "GetMenuStringA" (ByVal hMenu As Long, ByVal wIDItem As Long, ByVal lpString As String, ByVal nMaxCount As Long, ByVal wFlag As Long) As Long
Public Declare Function GetSubMenu Lib "user32" (ByVal hMenu As Long, ByVal nPos As Long) As Long

Public Const MF_BYPOSITION = &H400&
Public Const MF_GRAYED = &H1&

Here’s how you put a form in “Kiosk Mode”. This code gets a reference to the system menu of the current form. It then loops through each sub menu item of the system menu getting the menu caption, it then disables the sub menu using the ModifyMenu API call. This API requires you to pass a new caption to the disabled menu item, so we just pass the menu captions back to the ModifyMenu call.

  Dim hSysMenu As Long
  Dim lngCount As Long
  Dim lngLoop As Long
  Dim strName As String
  Dim lLength As Long
  Dim hSubMenu As Long
  Dim sSubMenuName As String
  
  '
  'Get a reference to the system menu of the form
  '
  hSysMenu = GetSystemMenu(Me.hWnd, False)
  '
  'Set the border style to fixed dialog
  '
  Me.BorderStyle = 3
  '
  'Set window state to normal so we can re-size it
  '
  Me.WindowState = 0
  '
  'Set form width to screen width and position at top left of screen
  '
  Me.Width = Screen.Width
  Me.Height = Screen.Height
  Me.Top = 0
  Me.Left = 0
  '
  'If we got a reference to the system menu
  '
  If hSysMenu Then
    lngCount = GetMenuItemCount(hSysMenu)
    '
    'loop through each item in the system menu
    '
    For lngLoop = 0 To lngCount
      sSubMenuName = Space(256)
      '
      'get a reference to the sub menu
      '
      hSubMenu = GetSubMenu(hSysMenu, lngLoop)
      '
      'get the caption of the sub menu
      '
      lLength = GetMenuString(hSysMenu, lngLoop, sSubMenuName, Len(sSubMenuName), MF_BYPOSITION)
      sSubMenuName = Left(sSubMenuName, lLength)
      '
      'gray out (disable) the sub menu item
      '
      ModifyMenu hSysMenu, lngLoop, MF_BYPOSITION Or MF_GRAYED, hSubMenu, sSubMenuName
    Next lngLoop
    '
    'redraw the menu bar
    '
    DrawMenuBar Me.hWnd
  End If

The result of this is a form fills up all the screen space, and while there are min/max/close buttons they do not actually do anything. Right clicking on the menu bar shows the form system menu but all items are disabled. The form cannot be be re-sized or dragged.

Of course you’re going to want to get the form out of kiosk mode. This is actually pretty simple, just use the GetSystemMenu call again but pass TRUE as the second parameter. Here’s what I mean:

      hSysMenu = GetSystemMenu(Me.hWnd, True)
      DrawMenuBar Me.hWnd
      Me.BorderStyle = 2

According to the API documentation the second parameter (bRevert) when set to true resets the window menu back to the default state. Which is exactly what we want!

There’s other ways to do this of course. For example, the RemoveMenu API call could be called to remove the sub menu items altogether and then restored as I have above. However my solution works fine and I am pretty happy with the result!

Including CSS on a Particular WordPress Page or Post

I deployed a site recently that made use of the Testimonials WordPress plugin. This plugin adds a CRUD interface to the WP dashboard where you can add/edit/delete customer testimonials. They can then be displayed in posts or pages using shortcodes. There’s a lot of parameters for the shortcodes but (somewhat strangely) there’s no apparent way of giving a particular instance of a testimonial a CSS class or ID. So there’s no easy way to style a testimonial on a given page of the site. This is particularly annoying if you want the testimonial bigger on a particular page for marketing reasons.

Now, a little aside here, I did PAY for the commercial version of the plugin. I shot off a couple of support emails to the author in the first couple of days of use and he completely didn’t answer one of them (he linked me to a FAQ page that didn’t answer my question), but he did answer a second question. However, when I asked him about the custom CSS class or ID for a testimonial he initially didn’t understand the question (which could have been entirely my fault) and then suggested I PAY for more support if I wanted his help. Now given that I had only just paid for the plugin a week or two before hand I thought that was a little rich. So, needless to say that’s the last email he’ll ever get from me, time to work this out myself.

I picked apart the HTML generated by the testimonial shortcodes. Each one is contained in a DIV with the CSS ID like .post-6666 where 6666 is the ID of the testimonial. The actual body text of the testimonial is contained in a <p> in the parent DIV.  All I needed to do was inject some CSS into the particular page where I needed a different style for the testimonial.  Turns out it’s not too hard.  Just add the following to your child theme functions.php file.

add_action( 'wp_head', 'custom_include_script' );

function custom_include_script()
{
   if(is_page( 'some-page-name' ))
   {    
    ?>
	<style type="text/css">.post-6666 p {font-size: 18px;font-weight: 500;font-style: italic;}</style>
    <?php  
   }		
}

The PHP Is pretty simple to understand. We’ve added an action to the wp_head call. The action checks if the page is the page we are interested in, if it is then it echoes out the CSS for the particular testimonial DIV. Hey presto different text size for the testimonial on a particular page.

Including a Javascript File in a Specific WordPress Page

Including a particular Javascript file for a specific page or post in WordPress is something that can be useful so that you do not needlessly load the file for every page of the site. Let’s take the example where we want to include the file “page-specific.js” file in the WordPress page “A Specific Page”. In this case I’m assuming the path to your page-specific.js file is:

/wp-content/themes/your-child-theme/js/page-specific.js

In the functions.php file of the child theme enter this code:

add_action( 'wp_head', 'custom_include_script' );

function custom_include_script()
{
    if(is_page( 'a-specific-page' ))
    {    
    ?>
	<script src="<?php echo esc_url( get_stylesheet_directory_uri() . '/js/page-specific.js"' ); ?>" type="text/javascript"></script>
    <?php  
    }
}

The PHP Is pretty simple to understand. We’ve added an action to the wp_head call. The action checks if the page is the page we are interested in, and if it is, it echoes out the HTML required to include the JS file. The get_stylesheet_directory_uri() call gets the directory of the child theme we’re using.

PHP in WordPress

I’ve been using PHP in a lot of WordPress posts and pages recently. Usually I just make use of the Exec-PHP plugin. This allows you to put PHP in any page or post using the usual <?php opening and ?> closing tags.  It’s a little clunky for a few reasons, firstly if you edit the page or post in the WordPress Visual editor it messes up the code. You work-around that using the Disable Visual Editor WYSIWYG plugin. A second reason not to do it this way is that editing PHP in the WordPress is horrid. I’d much prefer editing in my IDE of choice where I get nice syntax highlighting and can format the code nicely.

However, there’s a big reason not to include complex PHP directly in your pages or posts. That’s because the PHP is included in the database record for the page or post. Never a great idea from a security point of view. It turns out if you have a need for a complex PHP driven page there’s an easier way. Take the case where we want to create a PHP driven page called “My PHP Page”.

  • In your child theme folder (you are using a child theme I hope) create a copy of your page.php file and call it page-my-php-page.php.
  • Create a new page in WordPress and call it “My PHP Page”.

Now when WordPress renders the new page called “My PHP Page” and it finds the page-my-php-page.php file in the theme directory it will use that file to generate the page content.

I have found this approach particularly useful if you are building a simple CRUD system in WordPress. I’ve created a series of files called (for example) page-add-record.php, page-delete-record.php, page-edit-record.php, page-view-records.php. Each file contains the code required to add/edit/delete/display the database records I am interested in. Then I just need to create corresponding pages in WordPress with the names “Add Record”, “Edit Record”, “Delete Record”, and “Display Records”.

ob_gzhandler and Divi WordPress Theme are not happy bed-fellows

I’ve just finished rolling out a new WordPress site which uses the very nice Divi theme by Elegant Themes.  The site is hosted on Pair, and they do not have gzip compression enabled for Apache.  No problem I thought, someone must have solved that problem.  And sure enough Jon Henshaw had done exactly that.  There’s something not quite right with the way his blog is rendering (because it’s removed the underscores from the code) but basically all I had to do was put this at the top of my child theme header.php file:

ob_start("ob_gzhandler");

Once I’d done that I verified (using Google Chrome) that the download size of the each page on the site had decreased, and sure enough the 500K home page was now just a 100k download. Woot. Or so I thought.

Next morning I got up to a slew of emails asking me what happened to the site as all people could see was a blank page. I checked the site in Chrome, nope, it’s there. Checked it in Firefox, nope it’s there. Checked in IE10, nope there too. All there while I was logged into WordPress. With a growing sense of dread I logged out of WordPress in IE10, refreshed the home page of the site and….a blank page. Same for FireFox and for some reason, Chrome rendered the site just fine. I tracked the problem down to somewhere in the wp_head() call in the header.php file, but I really wasn’t interested in having the site down any longer so I removed the offending code above and the site started working correctly.

Today, with a bit of time on my hands I tested the same call in a couple of other themes (WP 2014 and on this blog) and it didn’t cause an issue. So, the only thing I can conclude at this stage is that ob_gzhandler and the Divi WordPress theme do not play well together.

Debugging a Visual Basic 6 Application Crash

In late 2012 one of my software products started failing on start up on certain computers.  The product is programmed in VB6 and uses a number of 3rd party controls. The concerning thing about it was that the product would run for months or even years on a computer and then one day, without warning, the software would start up, and display the dreaded “The Application has stopped working” message.  I must confess that for a long time I believed the issue was a minor one, and probably caused by a conflict with an anti virus program or similar.  I tended to (rather poorly) recommend rolling back Windows to an earlier point.  As the months rolled by I saw the issue on Windows Vista, Windows 7 (32 and 64 bit) and Windows 8 and 8.1.  Every 10 or 12 weeks I’d spend a day digging around on Google trying to get to the bottom of it with no luck.  For three reasons, firstly I had no real idea what I was looking for so my searching was rather aimless.  Secondly, I could never EVER ever reproduce the problem on any of the half dozen computers in my office, nor on innumerable VirtualBox machines.  And finally, I never really paid the problem the attention it deserved, which is entirely my fault.
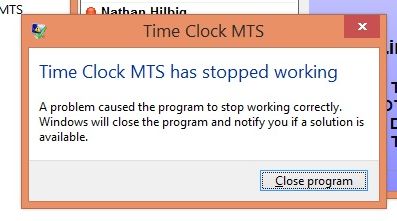
The Dreaded Application Has Stopped Working Message

However, in the last month the issue seems to have become more common, with the occasional person reporting it in my software uninstall surveys, and long term users reporting the sudden failure of the software on their computers.  Of course, if it was failing for trial users it was costing me money, but I couldn’t measure the loss so I ignored it.  That changed in the last month when I had to give a number of refunds to users who bought software that suddenly stopped working.  Ouch.  So the bug was really starting to concern me and to be honest, I’d started losing sleep over it because I just couldn’t work out what was going on.  I was even considering re-coding the entire product in C#, not a small task with 75,000+ LOC in the Visual Basic code.  I’d be looking at 6 to 12 months to completion and then at least 6 months of quick release cycles to get the bugs ironed out.  Not an exciting prospect and I’d still have the bug gnawing away at my sales while I was beavering away on the re-write.  And I’ll be honest I didn’t want to move the application to .NET.  I’ve ported a VB6 application to C# before, and while the coding structure was much nicer, the actual speed of the application was FAR worse than the VB6 app and I’ve had to resort to all sorts of caching chicanery to get the performance to what is a barely acceptable level.

Matters Come to a Head

Things came to a head yesterday, with two new people informing me of the error and it was looking like I’d have to refund both of them for purchases made in the last few months.  I spent some time poking around on Google again yesterday and finally hit on something useful, how to create application crash logs.  It turns out getting an application to create a crash dump is as simple as adding one new Windows registry key:

HKEY_LOCAL_MACHINESOFTWAREMicrosoftWindowsWindows Error ReportingLocalDumps

When the application fails it creates a dump file here:

%LOCALAPPDATA%CrashDumps

I tested this on my local dev machine by triggering an application failure and creating a dump file, which I then could open in VS 2010. I couldn’t make much sense of it though. All I needed now was a machine that was experiencing the crash to create a dump file for me and perhaps I could get to the bottom of things.

Along Comes a White Knight

I had the first glimmers of the possibility of getting to the bottom of this vexing issue last night, when a long time user of my product reported that he was experiencing the issue. Recently my usual approach has been to ask if I can get a short time to access the problem computer remotely using my remote access tool of choice, Teamviewer. Sometimes people say yes, sometimes they so no. In the case of this particular customer, he said sure you can have access, and I’ll leave it on ALL NIGHT for you so you can take as long as you like. HUZZAH!

Grabbing the Crash Dump

I logged into the customer’s PC remotely and ran my software. Sure enough, it crashed on startup. Interestingly when it crashed I saw a flash of the main application window before the troublesome error box appeared. I then tried starting up the software with the application window minimized, and hey presto it ran. But as soon as I activated the window the software crashed again. This confirmed what I’d already suspected, that the crash had something to do with the first redraw/paint of the application window. Examining the log files my software creates showed what it usually did, the software crashes somewhere AFTER the first form resize event. Anyway, I’d confirmed that the crash I was seeing was the same one other people had seen. Time to create the Windows Registry key I mentioned earlier to have the software create a crash dump. I did that, ran the software to crash, and looked in the %LOCALAPPDATA%CrashDumps folder and there was my crash dump. Transferring the file to my own computer I wondered what to do next.

WinDBG is King

I’d already opened up a crash log in VS2010 and to be honest it meant nothing to me. So I tooled about for a bit on Google and it appeared that the tool of choice was “WinDBG”. I found an installer for it on windbg.org. Once installed it fired up and I loaded up my crash log and was shown this:
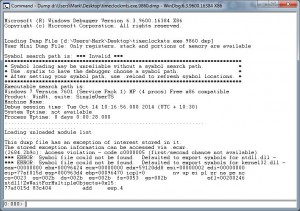
Crash Dump in WinDBG

Crash Dump in WinDBG

All very interesting but it doesn’t tell me much and the reason is on the 5th line of text “Symbol search path: *** Invalid ***”. Now, time for full disclosure, I am no computer scientist and my programming coursework was confined to PASCAL and I have little idea of computer architecture and a computer stack to me, is just a pile of computers. So, when I saw this message I had no idea what a “Symbol” was and had even less idea how WinDBG was going to help me. 10 minutes of research later I’d worked out that Symbols are used to decode the crash dump (which is essentially a memory dump) and allow WinDBG to display various function calls and function sources associated with the dump. Giving the debugger a symbol path is simple, just run the following command in WinDBG:

.sympath SRV*f:localsymbols*http://msdl.microsoft.com/download/symbols

Once that was done I could analyze the dump file again with:

!analyze -v

The analysis took a minute or so and the first thing of interest that popped up was:

*** ERROR: Symbol file could not be found.  Defaulted to export symbols for ciaXPLabel30.ocx - 
***** OS symbols are WRONG. Please fix symbols to do analysis.

ciaXPLabel30.ocx is a third party text label control used on the main form of the application. The same form that would partially re-draw before the fatal crash.

The actual call stack was many lines long, but basically was a repetitive loop that looked like this:

0009750c 72a09a7b msvbvm60!BASIC_DISPINTERFACE_GetTypeInfo+0x2aa
0009754c 72a09c2c msvbvm60!EVENT_SINK_Invoke+0x50
0009757c 758c370d oleaut32!CFontEventsCP::Notify+0x9f
000975d4 7589c30e oleaut32!CFont::DiscardFont+0x5d
000975e8 758c41e5 oleaut32!CFont::put_Size+0x76
000975fc 729932c4 msvbvm60!IID_IVbaHost+0x24c84
00097630 72973db1 msvbvm60!IID_IVbaHost+0x5771
00097684 729c1e19 msvbvm60!IID_IVbaHost+0x537d9
000976c0 729acdb0 msvbvm60!IID_IVbaHost+0x3e770
000976fc 729ad0a1 msvbvm60!IID_IVbaHost+0x3ea61
00097730 72980eed msvbvm60!IID_IVbaHost+0x128ad
00097990 4fbadfdb ciaxplabel30!DllCanUnloadNow+0x10efd
00097a28 4fbaa41a ciaxplabel30!DllCanUnloadNow+0xd33c
00097a64 75873e75 oleaut32!DispCallFunc+0x165
00097a80 72a16ef5 msvbvm60!_vbaAptOffset+0x68b

You’ll note in there that the ciaxplabel30 control has raised it’s head again. To my mind this was enough evidence to remove the label controls of that type from my form and replace them with vanilla Visual Basic 6 text labels. That took me about 20 minutes, I ran my automated build script and transferred the new executable file to my helpful user’s computer. And ran the application. And it ran. AND IT DIDN’T CRASH. So, two years of frustration and fruitless work followed by half a morning of focused effort and I’d fixed up my problem.

Where I Went Wrong

My main failing in this whole sorry saga was not paying the bug the attention it deserved. I dithered and procrastinated with it, and it wasn’t until it was costing me real money that I became truly motivated to solve it. Don’t get me wrong, I’d spent time looking into it but it was rather half-hearted. Shame on me.

Why I Went Wrong

There’s two main reasons outside of my control that contributed to the time taken to solve this problem. First, I work in a rather isolated fashion with no other programmers that I can bounce ideas off of. Add that to the fact that my technical understanding of crash dumps and dump analysis borders on non-existent and you have a situation that isn’t going to result in quick fixes. To remedy this in the future I’ll resolve to make better use of online resources like StackOverflow. If I’d asked a question there I am sure someone would have pointed me to the right path in short order. The second contributing factor was my inability to replicate the issue on one of my own dev computers. If could have done that I would have solved the problem through trial and error. Ipso facto, removing all the controls from the form one at a time until the application stopped crashing and solving the problem by trial and error.

Where I Went Right

I didn’t do any of this very well. I guess I did bumble onto the solution in the end but it took a long time and I was heavily reliant on a generous user of my software to do so. Without that help I wonder now if I would have ever gotten to the bottom of it all. Part of me doubts it.

Where to from Here

There’s an important new tool in my debugging arsenal now, and the next time (and I’m sure there’ll be a next time) I know were to start with application crashes. If I get stuck I will make better use of online resources and forums. And I will not sit on these problems and hope they resolve themselves.

ADO and MySQLConcurrency violation: the UpdateCommand affected 0 of the expected 1 records

I am always <sarcasm>overjoyed to learn about some obscure bug that breaks my software</sarcasm> and I got to find a new one last week.  This one, a problem that involves ADO, the MySQL ODBC connector, and MySQL.  Basically, the problem boils down to FLOAT columns in MySQL not resolving to the same value to rounding errors.  These rounding errors only seem to occur on some CPU’s and presumably, it’s because of the different ways that floating point math are implemented on those CPU’s.  Basically the upshot of this is that when a FLOAT column of 6.0 is selected it might be selected as 6.0000000000001 once and 5.99999999999 a second time.

Normally this wouldn’t be that big of an issue but if you’re using .NET and DataSets it can cause a huge issue.  If a DataSet is opened, edited and then the results saved with something like this:

        public void saveDataSet(DataSet pDataSet)
        {
            this.openConn();
            _commandBuilder.GetUpdateCommand();     
            _adapter.Update(pDataSet);
            this.closeConn();
        }

It appears that upon calling the Update method that the original record is retrieved to make sure that the values have not changed between the DataSet being edited and the changes being committed. Now normally this isn’t an issue but if your dataset is retrieved from MySQL, and there’s a float column, and the rounding error I described above happens, then a concurrency exception is thrown. Which looks like this:

Concurrency violation: the UpdateCommand affected 0 of the expected 1 records. Source:System.Data

And that makes sense, because you don’t want to overwrite someone else’s database edits. But of course, this isn’t an edit, this is a rounding error. As Sod’s law would have it I couldn’t get this error to throw on any of my CPU’s without some sort of manual intervention. So given that I KNOW there cannot be concurrent edits of the same database row I’ve had to change the above code to the following:

        public void saveDataSet(DataSet pDataSet)
        {
            this.openConn();
            _commandBuilder.ConflictOption = ConflictOption.OverwriteChanges;
            _commandBuilder.GetUpdateCommand();   
            _adapter.Update(pDataSet);
            this.closeConn();
        }

Adding the ConflictOption simply ignores the concurrency exception and the problem goes away.