Category Archives: Gadgets

New Laptop in Da House

I think I’ve bought 10 different Dell laptops in the last 8 years or so. They’ve all done their jobs admirably apart from one memorable XPS laptop which can only be charitably described as a piece of poo. That laptop gave me nothing but troubles from day one and despite Dell’s best efforts (and 4 or 5 on-site visits from a tech) could never be made to work correctly. To Dell’s credit they gave me an exchange computer to replace that computer and the replacement (a Vostro 14″ machine) has been flawless.

Anyway, my partner has been using a 15.5″ consumer grade Inspiron with Windows Vista for the last 4 years and it was starting to have some problems. I hate fiddling with computers to fix up glitches, especially 4 year old computers that are well past their use-by date. So rather than fix that PC off to the Dell Australia Outlet Store I went. I’ve had some luck picking up cheap machines and monitors from there in the past so I thought I’d try my luck again. The only criteria for the new machine were that it be a laptop, that it have Windows 7×64, and it have 8GB of RAM. There we a couple of likely prospects, one of which was an Inspiron and the other was a Vostro 3560. Ten minutes on the phone to Dell told me that the Inspiron wasn’t available any longer but the Vostro was and the purchase was made. 5 days later the new machine landed on our front doorstep.

The Dell Vostro 3560 seems like a nicely built machine. It’s certainly much nicer to handle and look at than the old Inspiron clunker it replaced. 4 hours of fluffing about with it last night as I moved the data from the old machine to the new one showed no problems at all with performance being snappy. Hardware wise the USB ports are a trifle stiff to get plugs into but the monitor is excellent with a 1920×1080 resolution. Even with a titchy 15.5″ monitor everything was quite readable at this resolution.

Of course this is no long term test but after 12 hours in our life the Dell Vostro 3560 laptop has done what it’s supposed to do perfectly. Recommended.

Fun With Gate Remotes

Broken Remote

Broken Remote

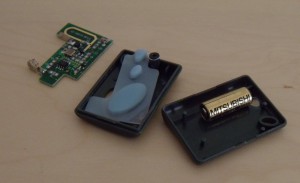
Don’t mess with me if you are a remote. Above are the broken remnants of a Gliderol TM-305C remote control that never worked properly. One day it chose to not work properly at the wrong time and as a result got smashed to bits by myself. Temper, temper. After calming down I bought another remote off of eBay thinking it wasn’t too much of a hassle because programming the remote to run our garage door is a doddle. Little did I think about how to program the remote to work our front gate. After some internet searches (useless) and poking about inside the gate actuator I figured out how to program the remote so I thought I would post it up here so I have a reminder of how to do it the next time I take out my frustrations on the remote control.

Deimos Gate Actuator

Deimos Gate Actuator

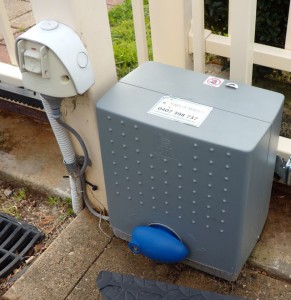
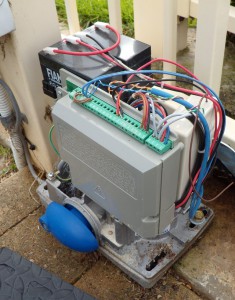
Above you can see the Deimos BT gate actuator that moves the gear rack attached to the bottom of our sliding gate. The actuator cover is held on by two stainless screws which when removed allow you to see the innards of the actuator as shown below.

Deimos Gate Actuator Innards

Deimos Gate Actuator Innards

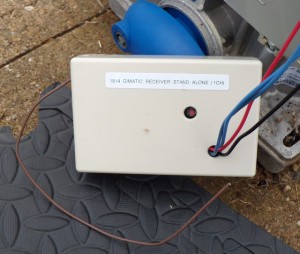
The actuator looks pretty neat, at the top left you can see two 12V batteries so we can open the gate when the power is off. The grey box at the front contains the actuator controller and just peeking around the top right is a fashionable looking beige box that contains the receiver for the Gliderol remotes. I worked this out because someone had helpfully labelled the box “1814 G/Matic Receiver Stand Along”. “G/Matic” presumably stands for Glidermatic which is Gliderol’s name of choice for anything electrical or electronic.

Glidermatic Receiver Box

Glidermatic Receiver Box

Removing the natty beige cover was done by unscrewing four screws and hey presto we are in circuit board land.

Receiver Circuit Board

Receiver Circuit Board

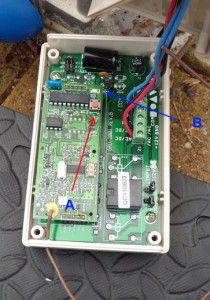
Now this circuit board looked pretty identical to the receiver board in our Gliderol garage door opener (you can see the Gliderol Remote Training Instructions here). Given it’s similarity I used the same technique to program the remote. I pressed the button on the circuit board (indicated by the arrow labelled A) which made the LED on the board (labelled helpfully as B) switch on. Then I pressed the big button on the new Gliderol remote which made the LED turn off.

And hey presto. Pressing the top auxiliary button on the Gliderol remote made the gate open. I am not sure how the remote (or the gate actuator) knows to use the auxiliary button to work the gate instead of the main remote button. But hey, these are the things of electronic pixies and programmable fairies. Let’s leave some things unexplained so life is more interesting.

Sony 3D Glasses

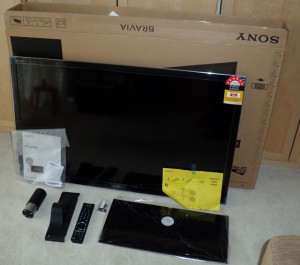
Because I was too eager to get the new TV I talked about recently I didn’t take the time to check that I could appreciate it’s 3D’ness with the included 3D glasses. It’s a shame I didn’t check that because it turns out it didn’t include any 3D glasses. So if I want to watch 3D material I need to buy some. Of course Sony’s glasses are (nightmarishly) expensive and this lead to some resistance to the idea of purchasing them from She Who Must Be Obeyed. But in the fine tradition of über-geeks everywhere I ignored her and bought some anyway**.

So there’s two pairs of Sony TDD-BR750 3d glasses heading my way soon. And if you’re wondering, no I didn’t pay the price listed on the Sony site, not even close. The glasses look rather natty and they trumpet out the fact that they weigh less than 40 grams. I am more interested in how they fit over my glasses though. Time will tell. Pictures will follow when they arrive.

**(Who am I kidding, I didn’t ignore her. I got them as a toy and she smiled at me tolerantly like she always does when I am spending money on things that we don’t really need. She’s too good for me really 🙂 )

A New TV Has Landed

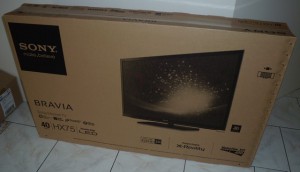
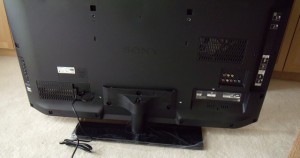
If anyone actually reads this blog they’ll know that I recently bought a new Panasonic HDD Recorder. Today it’s partner in crime took up residence here. It’s a 40″ Sony Bravia LED with the model number KDL40HX750. This makes it a 200Hz model with active 3d and lots of networking features. The choice in the end was made because the Panasonic LED I was looking at uses an LG panel which I didn’t like the sound of and the Sony comes with one of their new Google TV boxes. I don’t have the Google TV box yet because it’s claimed by redemption. This post isn’t a review of the TV because it’s only been here a few hours so I’ll just post up a few pictures and make some quick comments.

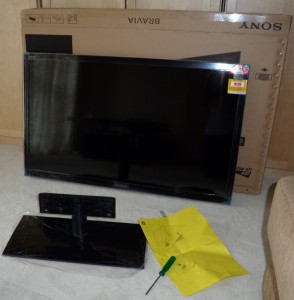
Firstly, assembling the TV is so easy a child could do it. I know this to be true because a child (my 9 year old son) assembled it with me helping out with any awkward lifting. Secondly, the setup process when you turn the TV on is quick and simple. I know that because he did that too. Thirdly, the built in networking features such as QuickFlix, ABC iView, YouTube and the Sony Entertainment Network look like they’ll waste a lot of my time. And finally for now, the ability to control the Sony from my IPad via the Sony Media Remote App is insanely cool. Being able to flick up URL’s, images, and videos from the tablet to the big screen is just amazing!

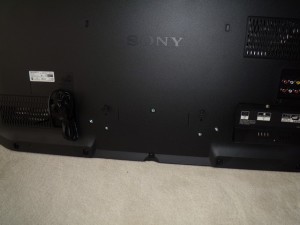
Enough for now, here’s some pictures.

The Box Shot - fit easily into a small hatch-back

The Box Shot – fit easily into a small hatch-back

The Box Contents - note the absence of 3d glasses (doh!)

The Box Contents – note the absence of 3d glasses (doh!)

TV Pedestal Assembled by 9 yr Old

TV Pedestal Assembled by 9 yr Old

Pedestal Mounting Points

Pedestal Mounting Points

Panel and Pedestal Assembly

Panel and Pedestal Assembly

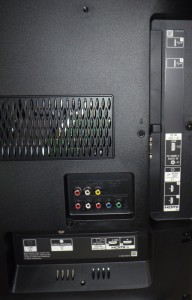
The Input Panel - Enough HDMI for Everyone!

The Input Panel – Enough HDMI for Everyone!

The Finished Product - Yes that's "The Voice" (shame on me)

The Finished Product – Yes that’s “The Voice” (shame on me)

Once the Google TV box arrives we’ll have to think about getting a proper TV stand for it. Seems like a shame to have such nice hardware slumming it on a coffee table I was given as a hand-me-down nearly 20 years ago.

Panasonic DMR-PWT520GL 500GB HDD Recorder / Blu Ray Player

So, our Panasonic 500GB HDD recorder with a Blu-ray player and twin HD tuners arrived last week. In this time my son, my partner, and I have fiddled with it enough for me to be able to post up some first impressions.

Firstly, the image and sound quality seems to be just fine, but we only have an old Toshiba 32″ LCD with questionable sound and image quality anyway. Secondly, the user interface seems to be excellent, both intuitive and responsive. My 9 year old son dived into it and had episodes of Doctor Who playing on the television via ABC iView in under a minute. My partner, who is scathing of any poor UI on anything also got something recorded and watched with almost no cursing at all. Surely that’s a vote of confidence.

The features the Panasonic offers seems to be rather comprehensive. I’ve had a Panasonic HDD recorder of one form or another since 2006 but this unit is the first I’ve had with the ability to pause and rewind live TV. While that may seem rather passé to most, they are new to me and I’m only just beginning to understand what possibilities they open up. The in-built TV guide seems to be excellent and isn’t afflicted by a 30 minute timing problem that all of the other TV’s and recorders in this house are. Recording direct from the TV guide is dead simple and the ability to adjust the start and stop times automatically is appreciated. One neat feature is the ability to press the Record button on the remote repeatedly to change the recording time limit when you want to record a show you happen to be watching. We haven’t seen this feature since we had a VHS and one person in this house rejoiced when it was discovered!

Another new feature on this unit that we have not seen in this house is Internet integration via either ethernet or wifi. Setting up the wifi was simple and support was provided for all the major wireless encryption protocols. Network integration allows the unit to stream media from media servers or act as a media server itself and stream data to media clients. Internet access also allows access to the Panasonic App Store which has a number of simple applications providing access in Internet services such as YouTube, ABC iView, Skype, and some other less known media services. This is a great feature but the lack of a web-browser means that you cannot see media from any web-site that doesn’t have a corresponding app in the Panasonic app-store. I haven’t tried to stream media from the file server I have here to the Panasonic yet but it’s certainly on the to-do-list.

There are some other features we haven’t played with yet. This includes the ability to record and playback from an external USB HDD. This requires registering and formatting the HDD so be aware that you’ll need to transfer any media files off of the disk prior to this process. A USB key can also be used for the same purpose if required. There’s a number of other things the unit can do that we almost certainly wont use such as viewing and organising image files and MP3 files. I am sure there’s things I have missed but I’ll need to have a read through the manual before I can add anything else.

There you have it. The Panasonic PWT520GL certainly gets a thumbs up from myself, my partner, and my 9 year old son. The quality seems excellent and it’s certainly easy to use. There’s a bunch of features on the unit and it’s likely we wont use most of them but it certainly meets our requirements.

Google’s New Tablet – The Nexus

Gizmodo, an Australian technology site I occasionally read has posted a scoop on what may well be Google’s foray into the tablet market, called the Nexus. It’s built by Asus and boasts a 7″ screen, a Tegra 3 CPU running at 1GHz, 1GB of RAM, and comes with either 8GB or 16GB of storage. It also runs Google’s latest incarnation of it’s Android OS, code-named Jelly Bean.

I don’t follow the tablet market at all, but I do have an Android phone and a first generation iPad. They are both fun devices but the phone is constrained by the hardware and sometimes slow and tricky to use. The iPad has proven to be nothing more than an expensive web-client which is useful enough but not for the original price of $700 or so.

The Google Nexus is of some interest to me for three reasons. Firstly, the supposed price, just US$199 for the 8GB model and $249 for the 16GB model. Secondly, developing for the Android OS is a much shallower learning curve than for the iPad. I’ve been doing on and off research on developing in .NET for Android using something like Mono for Android. Finally I am not too keen on the requirements for listing of apps in the Apple Store. Seems like a lot of hoops to jump through.

Oh, I guess I should own up to one final reason I like the idea of this tablet. At just $249 it’s not too much money to blow on what will be, essentially, a toy 🙂

New Panasonic Hi Def HDD Recorder Coming Soon

Kath wants to be able to record HD tv channels. Something that our current Panasonic recorder cannot do. I want to buy the Blu-ray version of Star Wars and then actually be able to watch it. This is also something that our current Panasonic recorder cannot do. So what’s the solution? Well, replace our perfectly good Panasonic DVD 250GB HDD SD recorder with this beast of course.

It appears to be WiFi enabled for some reason that I cannot determine (but anything with WiFi is better) and I’ve got high hopes it will play media off of an external USB HDD too. Just gotta wait for the May invoices to be paid by my lovely customers and I’ll be ordering one. Hopefully I’ll be back here soon to say happy things about it.

Telstra WTF!

So I have a new phone, it’s a HTC Wildfire S, a lower tier “smartphone”. It’s a pre-paid unit locked to the Telstra network that came with a SIM with $10 of credit. I used the phone to ring Telstra to activate the SIM. And it cost the $10 that was on the SIM. WTF!!!!! Nice service Telstra, charging people to activate their SIM. Just deplorable.

More on the phone and why I bought it at a later date. Oh, Telstra, you suck!

The Sliding Gate is Alive!

So the good folks at Gate-A-Mation (catchy name) came and automated the front sliding gate on the house a couple of weeks back. It rained pretty much the whole time which meant they were doing the job for a bit longer than expected, around about 3.5 hours. The actual installation of the hardware didn’t take too long, about an hour and a half. Then it was 2 hours spent adjusting various electronic settings in the motor and fiddling with the plastic rack on the gate to get the gate operating nicely.

The Deimos Gate Actuator

The Deimos Gate Actuator

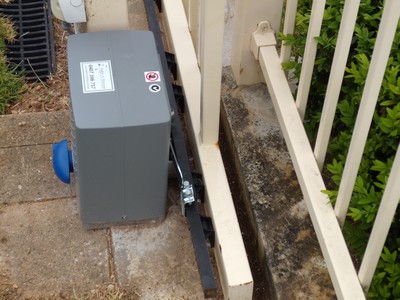
The motor is a Deimos BT 24V unit that runs off of the 240VAC supply that is available at the gate. You can see the motor above which is attached via dyna-bolts to a concrete foundation. The blue component is the manual clutch release that is unlocked via a key.

Close up of Gate Motor

Close up of Gate Motor

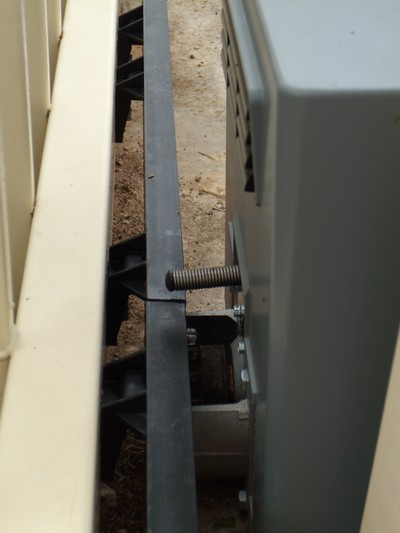
A view of the motor showing pinion that drives a nylon rack that the installers screwed to the bottom of the sliding gate. The spring in the middle is a spring switch that is activated by limit stops at each end of the gate.

Limit Stop and Rack

Limit Stop and Rack

A close up of one of the limits at the end of the gate and showing a section of the plastic rack on the bottom of the gate.

Keypad

Keypad

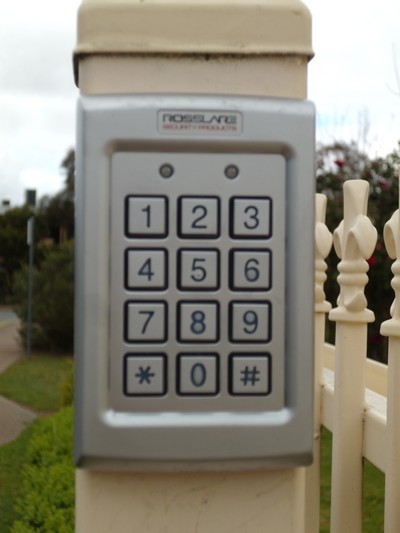
And my favourite part, the keypad for opening and closing the gate when you don’t have a remote. I wasn’t going to get this but one look at the nicely made stainless steel enclosure and tactile keys made me want it. It’s programmable to do all sorts of neat stuff (still have to read through the manual) and is backlit at night time! Anything with blue LED illumination MUST be good 🙂 The keypad is fixed securely to the outside post of the gate and has proved to be very useful to get in and out of our yard when we’re walking to the park.

Do the Gate-A-Mation

Tomorrow a local company is coming to automate the sliding gate at the front of our new house. This will allow our kids to safely play in the front garden without fear of them escaping or anyone getting in at them. It will also provide an additional level of security because anyone breaking in is going to need to hop the front fence on the way in and out.

We’re getting a Deimos BT motor with remote relay boards that suit the spare buttons on the remote controls for our automatic garage door. The motor uses a 24V DC drive with a step down AC/DC inverter and includes a battery backup allowing the gate to open and close in the event of a power failure. Manual release for the unit (to manually open the gate) is via a key and a clutch release mechanism on the motor. Which sounds like a pain in the butt. So, I’ve asked the installer to bring along some keypads to suit the motor because the idea of getting in and out via a keypad seems like a good one.