Category Archives: php

Last updated by at .

Decrypting Blowfish Encrypted HEX String in PHP

I had need recently to use PHP to decrypt some short strings that were encrypted using the Blowfish algorithm. They were encrypted to HEX strings which necessitated converting them to strings. An added complication was that the mcrypt library in PHP is deprecated from version 7.3 onward and this code needs to function beyond that point. A couple of things to note are that the openssl_decrypt call requires a 16 byte key even though it only uses the first 8 bytes, the mcrypt_decrypt call also only uses the first 8 bytes of the key (but can also be safely passed an 8 byte key). Also you can see that RTRIM is used to get rid of any trailing \0 (NULL) or \4 (EOT) chars. It’s not unusual for there to be trailing characters as the encryption process pads out the text to be encrypted to a number of bytes that is evenly divisible by the encryption key. The data I’m decrypting here was originally encoded in an old VB6 application which padded out the string to be encrypted with EOT characters.

The key shown in this code is NOT the key used to create the encoded HEX string as I’m keeping the actual key secret because it’s used in some commercial software.

<?php
$encrypted_string = hexToStr("7363284E8E3FEA58");
echo "encrypted string:: ".$encrypted_string . "<br />";
echo "decrypted string:: ".decrypt_blowfish_string($encrypted_string,0);

function hexToStr($hex) {
    $str = '';
    for ($i = 0; $i < strlen($hex); $i += 2){
        $str .= chr(hexdec(substr($hex, $i, 2)));
    }
    return $str;
}

function decrypt_blowfish_string($string, $force_openssl = 0) {
    $key = 'somekey';
    $key_length = strlen($key);
    if ($key_length < 16) {
        $key = str_repeat($key, ceil(16 / $key_length));
    }
    if (function_exists('mcrypt_encrypt') && $force_openssl==0) {
        $plaintext = mcrypt_decrypt(MCRYPT_BLOWFISH, $key, $string, MCRYPT_MODE_ECB);
    } else {
        $plaintext = openssl_decrypt($string, 'BF-ECB', $key, OPENSSL_RAW_DATA | OPENSSL_NO_PADDING);
    }
    return rtrim($plaintext, "\0\4");
}
?>

WooCommerce – Custom Product Fields and WooCommerce Fields Factory

WooCommerce does have ‘attributes’ available for products but like most things in WC these are tailored for users selling clothing and various other consumer products. In my application each product is unique and once sold gone forever. Each product has common characteristics though, such as year of manufacture, metal it is made from, and where it was manufactured. As a matter of course the user of the WooCommerce store wanted to define a set of characteristics that would be entered when a new product was created and then wanted those characteristics displayed in the product listing. A good solution was arrived at through the use of the WooCommerce Fields Factory plugin and modifying the Storefront Single Product->Tabs->description.php template.

The WC Fields Factory plugin allows you to add custom fields to your WooCommerce products. It has the added benefit of allowing you to display those fields on the admin side where they can be edited at the product level by your shop admins. Nifty. In my application I created a group of Admin Fields called “Coin Attributes” and then populated the group with the fields that the customer wanted for their products.

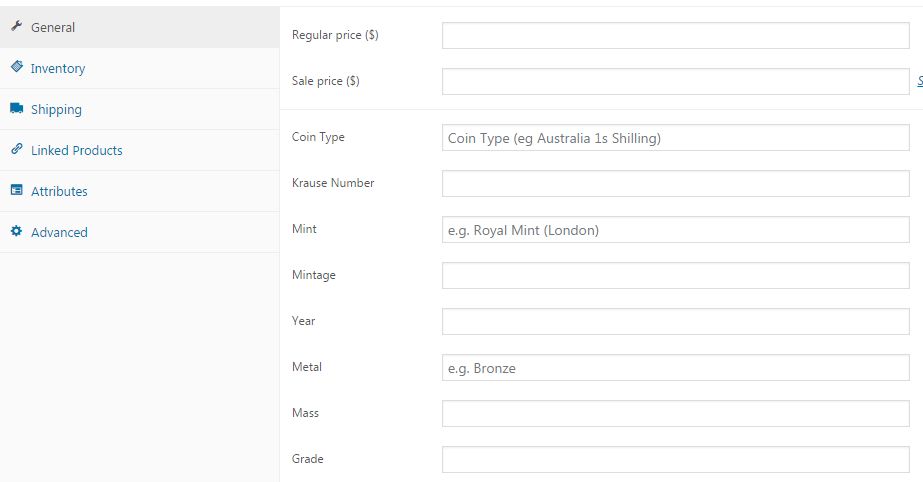
Once that was done and I made sure to check the Hide in Product Page and Hide in Cart & Checkout Page for each field. Now when I add a product I see this in the General tab for each product:

So now we can store the data with each product as needed. The next step is to make sure the data displays as required for products. The key is that we only want the data field to display if there’s a value set. To do that we just need to do a bit of tweaking to the Storefront Single Product->Tabs->description.php template. We do that by making a copy of it into the /woocommerce/single-product/tabs folder of our child theme. In our case we just wanted to display the data in a table. So the PHP code required looked like this:


<?php
    //get the custom field data using the get_post_meta function.  All WC Field Factory fields are prefixed with wccaf_ and then the field name
    $coin_type=get_post_meta( $post->ID, "wccaf_coin_type", true );
    $krause_number=get_post_meta( $post->ID, "wccaf_krause_number", true );
    $mint=get_post_meta( $post->ID, "wccaf_mint", true );
    $mintage=get_post_meta( $post->ID, "wccaf_mintage", true );    

//display information only if there's a value set
    $coin_information='';    
    
    if (strlen($coin_type)>0)
        $coin_information.='<tr><td class="coin-information"><strong>Coin Type:</strong></td><td class="coin-information">'.$coin_type.'</td></tr>';
    if (strlen($krause_number)>0)
        $coin_information.='<tr><td class="coin-information"><strong>Krause Number:</strong></td><td class="coin-information">'.$krause_number.'</td></tr>';    
    if (strlen($mint)>0)
        $coin_information.='<tr><td class="coin-information"><strong>Mint:</strong></td><td class="coin-information">'.$mint.'</td></tr>';         
    if (strlen($mintage)>0)
        $coin_information.='<tr><td class="coin-information"><strong>Mintage:</strong></td><td class="coin-information">'.$mintage.'</td></tr>';  

    if (strlen($coin_information)>0)
        echo '<table class="coin-information">'.$coin_information.'</table>';
?>

Of course where exactly you echo out the data in the TABS template is up to you and determined by how your product pages are laid out.
 

WooCommerce – Display SOLD Instead of Price for Sold Products

If you’re using WooCommerce and selling one-off products you don’t necessarily want to use the default terminology for sold out products. You might want to hide the sold price and remove the WooCommerce “In Stock” messages that are better suited to sites selling t-shirts and so on. Removing the stock availability messages is simple enough using the woocommerce_get_availability filter.

    add_filter('woocommerce_get_availability', 'my_get_availability', 1, 2);

    function my_get_availability($availability, $_product)
    {
        $availability = '';
    }

Couldn’t be any simpler, just set the availability text to an empty string.  Presto chango those messages are gone.

Replacing the price with SOLD when a product is sold is almost as simple, it just requires hooking into a couple more filters.

    add_filter("woocommerce_variable_sale_price_html", "my_remove_prices", 10, 2);
    add_filter("woocommerce_variable_price_html", "my_remove_prices", 10, 2);
    add_filter("woocommerce_get_price_html", "my_remove_prices", 10, 2);
    function my_remove_prices($price, $product)
    {
        if (!$product->is_in_stock())
        {
            $price = "SOLD";
        }
        return $price;
    }

WooCommerce – Add Phone Numbers to Header of Storefront Theme

I happen to like web stores that have contact details in prominent locations so it’s useful to be able to add phone numbers to the header of a site using WooCommerce. In my particular application I’m using the Storefront theme.  Firstly you need a  bit of CSS in your child theme’s style.css file. Your widths might be different and I’ve adjusted the margin of the site-search div to compress things a bit.

.header-contact-details {
    width: 50.7391304348%;
    float: right;
    margin-right: 0;
    clear: none;
}

.site-search{
    margin-bottom:10px;
}

Then you can use the storefront_header action to insert some code into the header.  To set the priority of the insertion have a look at the storefront header.php file.  In  my case I wanted the new HTML in between storefront_product_search and storefront_primary_navigation_wrapper so I set the priority to land in between those two.


//add phone numbers to header

    add_action('storefront_header', 'storefront_add_header_phone', 41);

    function storefront_add_header_phone()
    {
        ?>

        <div class="header-contact-details" style="text-align:right"><p style="color: rgb(64, 48, 74);font-weight:600;font-size:20px;"><i class="fa fa-phone" style="color:rgb(155, 126, 230)"></i> 555 555 555 (AUS)  <i class="fa fa-phone" style="color:rgb(155, 126, 230)"></i> +61 555 555 555 (INTL)</p></div>
        <?php
    }

The code is pretty clear, I make use of the font awesome font set to have some pretty phone icons and colour them to match the rest of the site style. Of course there’s a little bit of CSS inline here that could be moved into the style.css file but for now it works and I am happy with that. Here’s the what the end result looks like:

WooCommerce – Receive Copies of Customer Emails

If a user is new to WooCommerce it can be a little confusing what emails a customer is receiving and exactly what events are triggering the delivery of emails. To help alleviate the problem it can be useful to deliver copies of all customer emails (see the WooCommerce Email Notifications screen below) to another email address so they can be monitored.

WooCommerce Email Notifications Screen

In this case the woocommerce_email_headers() filter is useful. It allows you to intercept the email header and inject your own custom headers of the same form used by the PHP mail function. In my case I was happy to include a CC email address so I used this code:

//
//Send copies of customer emails to someone@somewhere.com
//
add_filter( 'woocommerce_email_headers', 'copy_customer_emails_headers_filter_function', 10, 2);

function copy_customer_emails_headers_filter_function( $headers, $object ) 
{
    if ($object == 'customer_completed_order' || $object == 'customer_invoice' || $object == 'customer_note' || $object == 'customer_on_hold_order' || $object == 'customer_processing_order' || $object == 'customer_refunded_order') 
    {
        $headers .= "CC: Someone <someone@somewhere.com>" . "\r\n";
    }

    return $headers;
}

The code itself is fairly self explanatory. It checks the passed object and if it’s one of the customer notification emails then the “CC: Someone <someone@somewhere.com>” . “\r\n” string is appended to the email headers. That email address will now receive a copy of all the emails sent to a customer. Of course the customer will see the CC address in their emails so you could include a BCC address with something like “Bcc: Someone<someone@somewhere.com>\r\n”.

WooCommerce – Default Manage Stock and Sold Invidually Values

I’ve had the somewhat dubious pleasure of launching a new WordPress / WooCommerce site for an established collectables business. The site replaced an aging cart system, that was frankly a steaming pile. Almost every item sold by this business is unique so they wanted to default the values for Manage Stock to true and Sold Individually to true.

The WooCommerce Inventory Screen

It turns out the easiest way to do this is to add some javascript to the admin_enqueue_scripts action that checks the form elements we need checked. Poking about with the Chrome element inspector at the WooCommerce stock handling form told me we needed the _manage_stock and _sold_individually checkboxes ticked and to set a value in the _stock text field. Here’s the code I put in my child theme’s functions.php file.

//
//set default stock handling values
//

    add_action('admin_enqueue_scripts', 'wc_default_variation_stock_quantity');

    function wc_default_variation_stock_quantity()
    {
        global $pagenow, $woocommerce;

        $default_stock_quantity = 1;
        $screen = get_current_screen();

        if ( $pagenow == 'post-new.php' && $screen->post_type == 'product')
        {
            ?>
            <script src="//ajax.googleapis.com/ajax/libs/jquery/1.8.2/jquery.min.js"></script>
            <script type="text/javascript">
                jQuery(document).ready(function () {
                    if (!jQuery('#_manage_stock').attr('checked')) {
                        jQuery('#_manage_stock').attr('checked', 'checked');
                    }
                    if ('0' === jQuery('#_stock').val()) {
                        jQuery('#_stock').val(<?php echo $default_stock_quantity; ?>);
                    }
                    if (!jQuery('#_sold_individually').attr('checked')) {
                        jQuery('#_sold_individually').attr('checked', 'checked');
                    }

                });
            </script>
            <?php
        }
    }

The code itself is fairly simple. The javascript is injected into the document.ready function but only if we’re adding a new post and the post type is WooCommerce’s product post type. The appropriate checkboxes have their checked attribute set to true and the _stock field is set to a value of 1 if it’s currently zero. Simples!

wpDataTables Filters in WordPress

I’ve started using wpDataTables for data driven tables in WordPress. The ability to have a table linked to an Excel spreadsheet is neat and the automagically formatted tables that use the jQuery Data Tables plugin are nice too. I needed to tweak few things though. First, center align the table titles. Easy enough using the wpdatatables_filter_rendered_table

add_filter('wpdatatables_filter_rendered_table','my_filter_rendered_table');

function my_filter_rendered_table( $table_content, $table_id )
{
	$content=$table_content;
	$content=str_replace('<h2>','<h2 style="text-align:center;">',$content);
	return $content;
}

The second issue I was having was with URL Link Columns. These are driven from an Excel spreadsheet by separating the URL and the link text with two pipe (|) characters. Something like:

http://someniftysite.com||Nifty Link Text

In the case of the data I was displaying some of the cells would need links and some wouldn’t. Trouble was wpDataTables appears to render every value in a URL Link Column as a link whether you pass it a URL or not. In fact, it uses the Link Text as the URL if you omit the URL. Instant broken links, yuck. No problems, I thought initially, I’d just use the provided wpdatatables_filter_link_cell filter to grab the URL links, parse out the URL and the link text and just return the link text if the URL was invalid. Pretty easily done with a bit of regex like:

	$url=preg_match('/href="(.*?)"/', $link, $url_matches);
	
	$link_text=preg_match('/>(.*?)<\/a>/', $content, $link_text_match);

It worked beautifully for the Link Text but rather frustratingly preg_match stubbornly returned 0 (no match) for the URL no matter what I tried. Even when I VAR_DUMP’ed the link it appeared that the preg_match should work. But it didn’t. In the end I used substr to echo back the link one character at a time and hey presto, wpDataTables was wrapping the href parameter in a single quote rather than a double quote. When I echoed the value to output using VAR_DUMP the browser (un)helpfully replaced the single quotes with double quotes. Grrrr. Anyway here’s the code that worked:

add_filter('wpdatatables_filter_link_cell','my_filter_link_cells');

function my_filter_link_cells($link)
{
	$content=$link;
		
	$url=preg_match("/href='(.*?)'/", $link, $url_matches);
	
	$link_text=preg_match('/>(.*?)<\/a>/', $content, $link_text_match);
			
	if (strpos($url_matches[1],"/")===false || strpos($url_matches[1]," ")!==false)
	{
		$content=$link_text_match[1];			
	}
	
	return $content;
}

Now my tables displayed links for values that actually had a proper URL and just text for those that didn’t. Yay.

wpDataTables seems pretty good, it isn’t free but $29 seems like a decent price for something that has worked pretty much exactly as advertised and has a tonne of features. Recommended.

Putting the Search Box into the Primary Menu in the Virtue Theme

I used the free Virtue theme in a recent contract and wanted to put the WordPress search box into the primary navigation menu. That was done easily enough by putting this into the child theme functions.php file:

function add_search_form_to_menu($items, $args)
{

    if( $args->theme_location != "primary_navigation" )
        return $items;

    return $items . '<li class="my-nav-menu-search">' . get_search_form(false) . '</li>';
}

However, the site I was building needed a private area for members and I’d been tinkering with the WordPress Access Control Plugin (WPAC) to accomplish that. The plugin allows you to display different menus to users who are logged in and those who are not. One menu (called Top Menu) was setup by WPAC to display as the Primary Navigation for users who were not logged into WordPress. While another (I called Top Menu – Private) was setup to display to members only. Obviously I wanted the WordPress search box to display on that menu too so I had to modify the above PHP slightly to allow for the private menu. Here’s how that worked:

function add_search_form_to_menu($items, $args)
{
    if( ($args->theme_location != "primary_navigation") && ($args->theme_location != "primary_navigation_wpac") )
        return $items;

    return $items . '<li class="my-nav-menu-search">' . get_search_form(false) . '</li>';
}

So there you have it. How to get the WP search box to display in the primary navigation menu when using the Virtue theme, and when using the Virtue Theme with the WordPress Access Control Plugin.

Filter Posts from Tag Archives in WordPress

I’ve been using a commercial WordPress plugin to manage customer testimonials for one of my products. One of the features of the plugin is a tag cloud. The cloud is generated from tags for each testimonial. I’ve used the tags to produce industry specific archives of customer testimonials, which is great for SEO purposes. However, in some cases I’ve created multiple testimonials for the same customer, allowing me to use a short extract or a sentence or two on a landing page rather than having to use the entire testimonial. This resulted in duplicate testimonials from the same customer appearing in the testimonial tag archives. I needed to find a way from stopping this. Here’s how I solved the problem.

First, I added a custom meta field to each duplicate testimonial that I didn’t want to appear in the tag archive. That looks like this:

Defining a Custom Meta Tag

Defining a Custom Meta Field

Given that the testimonials are custom post types I could filter the testimonials from the tag archives by testing for the existence of the new meta field (in this case I called it testimonial-widget-hide-on-tag-archive). The actual value you assign to the new meta field doesn’t matter. We just want the field to be present for the testimonials we do not want to display on the tag archives. To do that I needed to add an action to the pre_get_posts event and add a filter for the new meta key. Here’s the code I added to my functions.php file:

function modify_testimonial_tag_archive_query( $query ) 
{
	if (is_tag() && $query->is_main_query()) 
	{
		$meta_query[] = array(
                    'key'=>'testimonial-widget-hide-on-tag-archive',
                    'compare'=>'NOT EXISTS',
                );	
		$query->set('meta_query',$meta_query);
  }
}
add_action( "pre_get_posts", "modify_testimonial_tag_archive_query" );

Some key things to note here are the use of is_tag() to check that the query is tag based. Then the use of the $query->is_main_query() call to make sure the filter is used for the main query only (the one that works out what posts to display). The $meta_query array is used to put in the key for the new meta field for the posts we created above, and then we’re using the NOT EXISTS comparison. The result of all this is that only posts that DO NOT have the meta value testimonial-widget-hide-on-tag-archive will be displayed on tag based archives.

PHP in WordPress

I’ve been using PHP in a lot of WordPress posts and pages recently. Usually I just make use of the Exec-PHP plugin. This allows you to put PHP in any page or post using the usual <?php opening and ?> closing tags.  It’s a little clunky for a few reasons, firstly if you edit the page or post in the WordPress Visual editor it messes up the code. You work-around that using the Disable Visual Editor WYSIWYG plugin. A second reason not to do it this way is that editing PHP in the WordPress is horrid. I’d much prefer editing in my IDE of choice where I get nice syntax highlighting and can format the code nicely.

However, there’s a big reason not to include complex PHP directly in your pages or posts. That’s because the PHP is included in the database record for the page or post. Never a great idea from a security point of view. It turns out if you have a need for a complex PHP driven page there’s an easier way. Take the case where we want to create a PHP driven page called “My PHP Page”.

  • In your child theme folder (you are using a child theme I hope) create a copy of your page.php file and call it page-my-php-page.php.
  • Create a new page in WordPress and call it “My PHP Page”.

Now when WordPress renders the new page called “My PHP Page” and it finds the page-my-php-page.php file in the theme directory it will use that file to generate the page content.

I have found this approach particularly useful if you are building a simple CRUD system in WordPress. I’ve created a series of files called (for example) page-add-record.php, page-delete-record.php, page-edit-record.php, page-view-records.php. Each file contains the code required to add/edit/delete/display the database records I am interested in. Then I just need to create corresponding pages in WordPress with the names “Add Record”, “Edit Record”, “Delete Record”, and “Display Records”.