Category Archives: web servers

Installing Munin on a Linode Node

I’ve followed this guide for installing Munin on my nodes at Linode a few times now. Munin is a remote server monitoring tool that allows you to monitor all sort of things about the health of your servers. Servers you want to monitor are “munin-nodes” and the server where you view all of the reports from is the “munin-master”. It all makes sense but the Linode installation guide fails horrifically if your apache webroot is not the default /var/www that Munin expects it to be. So as a reminder to myself, here’s how I got Munin working on a server where the web root was /srv/www.

First, follow the install guide exactly as instructed by the good folk at Linode. Then modify /etc/munin/apache.conf to remove references to /var/www and change them to your web root of choice. My file looks something like this:

Alias /munin /srv/www/munin
<Directory /srv/www/munin>
                Options Indexes FollowSymLinks MultiViews
                AllowOverride all
                Order allow,deny
                allow from all
    <IfModule mod_expires.c>
        ExpiresActive On
        ExpiresDefault M310
    </IfModule>
</Directory>

Then I restarted Munin with:

sudo /etc/init.d/munin-node restart

I happen to use my munin-master as a dumb web host so the pretty Munin web pages are just in a folder off of the web root. You could be tricky and put them on their own sub-domain but I’ve chosen not to do that. So they live in a sub-folder and I can access them using this address:

http://www.your-site.com/munin/

And when I did I was seeing a 403 forbidden error. And when I took at look at the apache error log saw an entry like this:

[Mon Feb 03 04:09:23 2014] [error] [client 123.123.123.123] client denied by server configuration: /var/cache/munin/

Clearly Munin is still trying to access a folder outside of my webroot. So then it was a matter of adding this new section to my /etc/apache2/sites-available/default file:

        <Directory /var/cache/munin/www/>
                Options Indexes FollowSymLinks MultiViews
                AllowOverride None
                Order allow,deny
                allow from all
        </Directory>

Then restarting apache with

sudo /etc/init.d/apache2  restart

Now if I visited the Munin pages using the same address as above I can see pretty graphs telling me all about my servers! w00t!

Installing the RFC 868 TIME Service on Ubuntu

One of my products uses an old OCX control that can query NIST and old RFC 868 TIME servers to get the current time. To make things easier for the users of the product I have a server that provided the RFC 868 TIME service for them to use. The main reason I did this is that service for such an old protocol is a little patchy and I wanted them to have a server they could rely on. Main problem is that the old protocol isn’t included in Ubuntu any more (the newer NTP protocol is supported though with NTPDATE or NTPD). So I’ve had to work out how to enable the RFC 868 Protocol on one of my new servers. Turns out it was pretty simple. First download and install the XINETD super-server.

sudo apt-get install nfs-common nfs-kernel-server xinetd

Then edit /etc/xinetd.d/time to enable the time server. I changed mine to the following because I only wanted to use the TCP version.

service time
{
        disable         = no
        type            = INTERNAL
        id              = time-stream
        socket_type     = stream
        protocol        = tcp
        user            = root
        wait            = no
}

# This is the udp version.
service time
{
        disable         = yes
        type            = INTERNAL
        id              = time-dgram
        socket_type     = dgram
        protocol        = udp
        user            = root
        wait            = yes
}

Final step was to restart the XINETD super server with:

sudo /etc/init.d/xinetd restart

Note to self. Ditch the OCX control and build something in .NET that uses the newer protocol on port 127.

Installing the PHP MCRYPT Extension on Ubuntu

I use the PHP mycrypt extension to generate some encrypted URLs for one of my online applications. I had reason to test some of this functionality on my local development web server recently and the following error was thrown by PHP:

Call to undefined function mcrypt_create_iv()

Turns out that I didn’t actually have the MCRYPT extension installed on my little Ubuntu web server. Doing so was simply a matter of typing this at a command prompt:

sudo apt-get install php5-mcrypt

And that’s it. No need to re-start Apache or anything else. Groovy.

Uploading to a Production Server with RSYNC

I knew you could use RSYNC to synchronize a local copy of a website with the files on your production server. In fact I’ve known it for long enough to have tried to get it working a few years ago but failed miserably. Well I’ve learned a bit since then (well I like to think so anyway) so I thought I’d give it another go this this morning. And, it was surprisingly easy. In this guide I refer to my local server (a teeny tiny Ubuntu server) as the LOCAL SERVER and the remote production server as the REMOTE SERVER.

Install SSH Key on Remote Server

Firstly I needed to install a SSH key on my REMOTE SERVER so my LOCAL SERVER could log into it without me needing to enter a password every time I wanted to synchronize the files. This is easy enough, on the LOCAL SERVER enter the following:

sudo ssh-keygen

Enter the default values as prompted and this will create a public key in ~/.ssh/ called id_rsa.pub. This file needs to be set to the remote server. This is done easily with:

scp ~/.ssh/id_rsa.pub user@remote_server.com:/home/user/uploaded_key.pub

Then this file needs to be appended to the authorized_keys file on the REMOTE SERVER with:

ssh user@remote_server.com "echo `cat ~/.ssh/uploaded_key.pub` >> ~/.ssh/authorized_keys"

Construct RSYNC Included and Excluded Files / Folders List

If you’re like me your development folders are littered with test files and directories that you don’t want on your production servers. So you’re going to need to create inclusion and exclusion lists for RSYNC to use so it knows what to upload and what not to upload. This is simply done using text files with file / folder specifications on separate lines. For example my include.txt looks something like this:

app
classes
create-scripts
cron-scripts
css
inc
js
images
tooltips
validation_scripts

While my exclude looks something like this:

/app/jscal
/css/img/Thumbs.db
/create-scripts/*.txt
app/test-first-day-of-week.htm
app/test-mcrypt.htm
app/images/Thumbs.db

These files can be written in nano and saved somewhere sensible (probably where you’re going to put your rsync bash script).

Write your BASH script

Next step is to write a very short bash script that includes your RSYNC command. My script looks like this:

#!/bin/bash
rsync  -v -u -r -a --rsh=ssh --stats --progress --files-from=include.txt --exclude-from exclude.txt /srv/windows-share/local-source-files/   user@remote-server:/srv/www/remote-source-files/

Don’t forget you need to make your script executable with something like:

sudo chmod 700 rsync_upload.bsh

Also you’re going to want to test the RSYNC command using the -n (or –dry-run) option to make sure everything works the way you expect it to. You’ll also need to specify the -r (recursive) option because the –files-from directive overrides the implied recursion you get from the -a (archive) option.

Run your Script

So now when you’re done developing and testing files on your development server it’s simply a matter of running your new script to sync the files on your production server. Something like the following will run your script:

sudo /path/to/script/rsync_upload.bsh

Serving up Different Websites on My Local Network

I manage a number of different websites and most of the development has been done offline on a Windows 7 machine. I use the LAMP stack for all my sites and have always found the easiest method of setting up an equivalent WAMP stack on a Windows 7 machine was using XAMPP by Apache Friends. This has always worked fine but was a bit clunky when I wanted to change which website I was working on. It meant killing the Apache processes (httpd.exe) in the Windows task manager, editing the Apache conf file to change which site I was working on and then re-starting Apache. And when crap programs like Skype keep grabbing port 80 restarting Apache is always a pain in the butt.

There had to be an easier way so this week I took an hour out of my day to work out what it was. I already had Apache installed on my mini file server that runs Ubuntu so it was just a matter of getting that to work properly to serve up different sites. And that was (surprisingly) simple.

Edit the Hosts File on the Server

First step was to edit the hosts file on the linux machine with

sudo nano /etc/hosts

And then add entries for the sites I wanted to be served up locally. So, my hosts file ended up looking something like this:

127.0.0.1       localhost
127.0.0.1       local-site-1
127.0.0.1       local-site-2

Create Sites Available Files

I then had to create files for each site to sit in Apache’s sites available directory (/etc/apache2/sites-available/)

These files are pretty simple and in my case looked like this:

<VirtualHost *:80>
    ServerName local-site-1
    DocumentRoot "/srv/path/to/local/site/1/html_root/"
</VirtualHost>

Just change the server name to your local site name and the DocumentRoot to the path where the files for the site reside. In my case DocumentRoot is a SAMBA directory that is accessible from my windows machines (so I can edit the files from my dev machines). Name each file sensibly (in my case I named them local-site-1 and local-site-2).

Enable Sites and Reload Apache

Enabling the new sites is simple, just use the following command:

sudo a2ensite /etc/apache2/sites-available/local-site-1

Then reload the apache configuration with:

sudo /etc/init.d/apache2 reload

Edit the Windows Hosts File

The final step is to edit the hosts file on the Windows machines you want to access the local sites. On Windows 7 this can be found in:

%systemroot%\system32\drivers\etc\

I opened this in Notepad and changed it to look like this:

127.0.0.1 localhost
192.168.2.3 local-site-1
192.168.2.3 local-site-2

Note that 192.168.2.3 is the IP address of my file server.

Now if I want to access one of these local sites in a browser I just need to type local-site-1 into the address bar and hey presto I see the local copy of the website served up by my file server. I love increased productivity!

Potential Improvement

One potential improvement to this process is to remove the need to edit Windows hosts files by installing a DNS server (like dmasq) that will resolve the local site URL’s into an IP address. Of course this would require changing the DNS settings on the Windows machines.

Installing Ubuntu on a Mac Mini

A I mentioned in a previous post we had some power surge issues here recently. And our file server, a 2011 vintage Mac Mini called “Einstein” was one of the victims of the the surge. I don’t want to talk much about the accredited Mac repair shop that tried to repair the Mac Mini. But suffice to say, they didn’t. They did replace one of the HDDs and tinker with it a bit. And I gave them some money for doing so. The result of this was that three weeks after the power surge I was lighter in the pocket and had a Mac Mini that supposedly worked fine yet would crash repeatedly when sitting on the desk in my office.

Einstein - A 2011 Mac Mini with 2GB of RAM and dual 500GB Hard Disks

Einstein – A 2011 Mac Mini with 2GB of RAM and dual 500GB Hard Disks

I needed the Mac Mini working or failing that, something else. Something to act as a file server and something with a Unix based operating system on it so I can run CRON jobs and do various other things. So, I decided to have one last go at getting “Einstein” working. And this time I decided on something drastic. Ditch MacOS 10 and try installing Linux (namely Ubuntu server) on it. There were three reasons for this. Firstly, the Mac repair place assured me they could find nothing wrong with the hardware in the computer so presumably there was something wrong with the OS. Second, I am moderately comfortable with Ubuntu server because it’s what’s running on my managed web servers. And finally, I hated MacOS 10 Server with a passion. The GUI is awful and I always found myself dropping to the command line to do things.

So, no guts, no glory. Let’s install Linux on the Mac.

1. Create a Bootable USB Drive

Einstein is a dual 500GB HDD Mac Mini with 2GB of RAM and no optical drive. So, the only sensible way of getting an OS on it was via a USB stick. I grabbed a spare 8GB stick, downloaded Rufus and created a bootable stick using the ISO I had of Ubuntu 12.04 LTS. Putting the stick into the back of the Mac I held down the left ALT button on my keyboard and booted it up and was shown the boot device menu. There I could see both internal hard disks which were setup in a bootable RAID 1 array. But no USB stick. Bother. A bit of Googling later and I’ve found out Mac Mini’s don’t have BIOS they have UEFI to link their software and hardware and therefore they require a bootable USB stick to be setup for a UEFI computer.

Rufus provides a few options for the partition scheme and the target computer type, one of which is GPT Partition Scheme for UEFI computer. I selected this option and tried to build the USB stick again but Rufus complained with the following message:

“When using UEFI Target Type, only EFI bootable ISO images are supported. Please select an EFI bootable ISO or set the Target Type to BIOS”
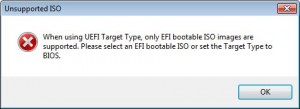
Rufus Doesn't Like the Ununtu 12.04 ISO

Rufus Doesn’t Like the Ununtu 12.04 ISO

Off to the Ubuntu website I go and download Ubuntu Server 13.04 which it says supports UEFI computers. I rebuilt the USB stick, rebooted the Mac to the boot device menu and hey presto there’s my USB stick! Victory!
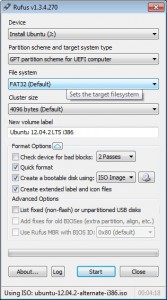
My Rufus Settings

My Rufus Settings

2. Boot the Mac Mini to the boot device menu

This is simple, just boot up the Mac Mini and hold down the left ALT key. After a brief pause you’ll be shown the boot device menu which looks something like that shown below.
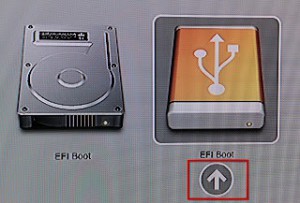
Mac Mini Boot Device Menu

Mac Mini Boot Device Menu

The EFI boot option was my USB stick. I clicked on that and booted into the Ubuntu installer.

3. Install Ubuntu Server

I won’t take you through the entire process of setting up Ubuntu server on the Mac. I encountered a few snags on the way that were almost all to do with getting the two 500GB disks working in a RAID 1 format. The Ubuntu install script does an admirable job holding your hand through the raid setup process (this is the first time I’d ever done it) but there were a few hiccups along the way.

The first, was that one of the disks just wouldn’t be setup with a UEFI boot partition. It just refused. I don’t know if some HDD’s only allow MBR boot partitions or not. But one of these HDDs just got persnickety and refused to cooperate. So, after much fiddling about I ended up with the following partitions on the drives.

HDD1 (/dev/sda)

100 MB UEFI Boot Partition
50GB ext3 partition mounted as root
400 GB raid partition
50 GB swap partition

HDD2 (/dev/sdb)

400 GB raid partition
100 GB ext3 mounted as /usr

I setup /dev/md0 as my raid array using the two 400GB partitions as the members of the array and mounted /dev/md0 as /srv.

This solution isn’t ideal because if /dev/sda goes down I won’t be able to boot the Mac as I couldn’t make /dev/sdb bootable. But that’s not the end of the world. I can still boot it up via my handy USB stick and get the data off of the drive onto an external HDD if needed.

4. Give the Mac a Fixed IP

Now I needed to get Einstein on the network. I wanted to give it a fixed IP. So I used:

sudo nano /etc/network/interfaces

And changed the settings for eth0 from dhcp to the following:
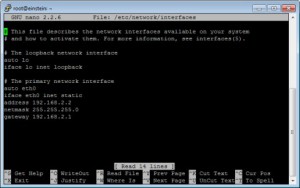
Einstein's Interfaces File in a PuTTy Session

Einstein’s Interfaces File in a PuTTy Session

Then it was a matter of restarting the networking process with:

sudo /etc/init.d/networking restart

5. Setup a Simple Windows Share

As part of the install process for Ubuntu I’d chosen to install Samba. Now it was just a matter of setting up a simple share of my RAID array to allow the Windows PC’s on my network to access Einstein. Here’s how I did that:

sudo nano /etc/samba/smb.conf

Then change

workgroup = myWorkGroupName
security = user

And add this entry at the bottom of the file:

[share]
comment = Einstein File Share
path = /srv/windows-share/
browsable = yes
guest ok = yes
read only = no
create mask = 0777

Save those changes, exit the text editor and then enter the following:

mkdir -p /srv/windows-share/
chown nobody.nogroup /srv/windows-share/
restart smbd
sudo restart nmbd

Once I’d done that it was simply a matter of going to a Windows PC and typing:

\\Einstein\

into Windows explorer and I could see the new shared drive.

6. Setup a GUI for Ubuntu Server

Next I decided to install a GUI for the new server. And surprised I was to read that only wimps have GUI’s on their servers. But hey, I am a wimp, and I like to have multiple terminals open. I went ahead and installed lightdm which is the default GUI and display manager for Ubuntu. I did it with this:

sudo apt-get install ubuntu-desktop

However, I experienced a lot of graphical glitches with this. Perhaps it’s not fully supported on the video card in the Mac. Who knows. I got around it by installing another display manager with:

sudo apt-get install xdm

When I started the GUI next time Ubuntu asked me if I wanted to use LightDM or XDM. I chose XDM and the GUI has worked fine ever since.

For those that are interested you can exit from the GUI using CTRL-SHIFT-F1. And if you want to restart the GUI just enter

sudo /etc/init.d/xdm start

Conclusions

I don’t trust Einstein just yet. It’s been up and running for 48 hours without issue but I don’t want to trust my files to it just yet. Right now it’s running some CRON jobs in tandem to my existing cobbled together file server. I’ve also got it syncing some files from my main PC to see how it goes doing that. I’ll let it do this for a week or so and use it to serve some live files for some of my less important tasks. Once I’m happy it’s working OK I’ll do a data integrity check on the files it’s holding. If it passes that then Einstein will be back in the good books and I’ll put it back into live operation again.

Other Useful Stuff

Here’s some other useful things I found out through this process.

To set the default text editor in Ubuntu (I can’t use vi or emacs) using:

sudo /usr/bin/select-editor

I know enabling su is a security risk but I got sick of typing sudo. So to enable su just use this:

sudo passwd root

Caching Your Website Content

I’ve always tried to include some varying content on my websites because many people believe it helps your search engine rankings. The logic being that fresh content is likely to be more relevant and get a boost in the SERPS. I don’t know if it’s true or not because I can’t find anything definitive posted by anyone from Google or a similar major search engine. In any event, it seems like a good idea and I’ve been including a small amount of changing content on my website for years. Thinks like the last 5 blog entries or customer testimonials mainly.

That sort of content is database driven so rather than hit your database every time there’s a pageview you should consider creating the content on a regular basis and having your website display the cached information. I do this with PHP and CRON jobs. My PHP script generates the content and writes it to a file. A bit of PHP in the web template includes that file to display the content. The CRON job runs the PHP that generates the content, perhaps hourly, but more commonly, daily.

Here’s what my CRON jobs generally look like:

14 */8 * * * php /srv/www/public_html/cron-scripts/create-blog-links.php

And a skeleton PHP script to generate some content looks something like what I’ve shown below. Note that I echo out the data created because (generally) when your cron jobs are run you’ll get an email from your server displaying the output from the script.

	$now=microtime(true);

        //code to generate content goes here

	$file_name="/path/to/webroot/generated-includes/blog-links.php";
	
	$content=get_content();
	
	if (strlen($content)>0)
	{
		$file_handle=fopen($file_name,'w') or die('cannot open file');

		fwrite($file_handle,$content);
		fclose($file_handle);
	}
	
	echo "create-blog-links.php complete, run time:".number_format(microtime(true)-$now,4)." seconds<br /><br />";
	echo "$content<br />";
	
	
?>

And finally, the include for my web templates that actually show the generated content. Again I do this in PHP.

include('/usr/www/generated-includes/latest-blog-links.php');

I believe this process could be taken one step further (and it’s something I plan on experimenting with) by actually rotating the parts of the static content of a website. I think I’d do this less frequently, perhaps weekly or monthly and you’d want to make sure you have a large pool of static content to rotate in and out.

Munin and Disk Space

This entry is really here to remind me what went wrong with Munin so the next time it happens I am likely to remember. I use Munin on my web servers to monitor them. I run Munin nodes on the web-servers and the Munin master is another computer that just serves up the Munin web pages and runs some rsync commands via cron jobs. This system has been working faultlessly for 2 years and then on September 26 2012 it stopped updating the graphs. Yesterday I finally got around to figuring out why it didn’t work any longer.

First thing I did was take a look at the munin logs on the clients, these are in the /var/log/munin directory. These logs were showing a last modified date of September 26, the same date the munin graphs stopped updating. I opened up the last log in nano and there was exactly nothing of help in there. So I tried re-starting the munin node process with:

restart munin-node

I sat there watching the log files for 5 minutes hoping they’d update. Sadly they didn’t. So I started up a new PuTTY session with the machine running the munin master took a look at the munin logs in /var/log/munin/. They all had the September 26 modified date too. I had a quick look through the logs and couldn’t see anything in there either. Next step was to force a manual update of the munin master and see what happened there. I did this by changing to the munin user with:

su - munin --shell=/bin/bash

And then running the munin-update (which gets all the data from the munin-clients)

/usr/share/munin/munin-update --debug

When I ran this command the update, which should be hundreds of steps was just four steps with the last one complaining about there being no free disk space! Eureka!

Next step was to check the disk usage on the server. I sorted this by directory and displayed it in human readable format with:

du -sh * | sort

This indicated that a directory that contained database backups was using up almost all the disk space on the server. A quick removal of older files from this location freed up a lot of space. I forced a munin update again and hey presto everything started working.

All of this would have been easily solved if I actually had munin monitoring the server that acts as my munin master, but of I course I haven’t done that. Stupid me. I’ll put that on the to-do-list, but for now at least the problem is solved and will not re-occur for several months.

Redirecting Unwanted Domains Pointing at Your Content

In the last year I’ve had people pointing unwanted domain names at my own website content. For example, let’s say I have a web site called http://www.foo.com that uses the name server reallycool.nameserver.com. If I wanted to be a pain in the butt I could point another domain (say http://www.annoyingwebsite.com) at the same content by using a custom DNS A record or a 301 redirect. It’s a pretty simple matter to work out the nameservers and IP of a site by using a tool like this.

The problem with someone doing this to your website is that search engines (like Google) see this second website as a duplicate of your own website. Now, in theory this shouldn’t be a problem because Google should determine that your website was the first listed and pretty much ignore the duplicate site. In theory anyway, but the paranoid part of me says having a copy of your website is a Bad ThingTM. Another problem is that this spurious second site will show up in search listings and also in your website referrer logs. It’s an annoying, and potentially damaging issue.

I tried a few different things to stop this from happening including messing about with .htaccess files but ended up just adding the following to the top of my global header file (which happens to be php).

	//
	//Redirect people hijacking site
	//
  if ($_SERVER['HTTP_HOST']!='www.foo.com' &&  $_SERVER['HTTP_HOST']!='foo.com' && $_SERVER['HTTP_HOST']!='localhost')
  {
   Header( "HTTP/1.1 301 Moved Permanently" ); 
   Header( "Location: http://www.google.com" ); 
  }

Note that I’ve got the localhost entry in there to allow for debugging of my websites on my local PC.